Configuring a Static Route
If your network configuration uses more than one subnet, you will probably need to configure a static route so that a device on one subnet knows how to reach a controller on another. There are three common methods: a static route in the router, a static route on a computer, or a Proxy Host.
The examples below assume your home/show router has an address of
192.168.0.1, your FPP connects to the home/show network via Wi‑Fi and to the
controller via Ethernet, and the controller needs an IP on a different subnet
than the home/show network — here 192.168.101.2. The FPP needs an address on
the wlan0 interface in the same network as the router (192.168.0.101) and an
address on the eth0 interface in the same subnet as the controller
(192.168.101.1).
Note
This mirrors the general rules in Networking Overview — a device with two interfaces should have them on different subnets, with a gateway on only one (normally the home‑facing interface).
Static Routing in router
Not all routers support static routing, but most do, and this is the preferred method — a route added in the router is available to every device on your network, not just one computer. Because there are so many router manufacturers and interfaces, the exact steps vary; look for an advanced section called Routing, Advanced Routing or Static Routing. The fields will be similar to this:
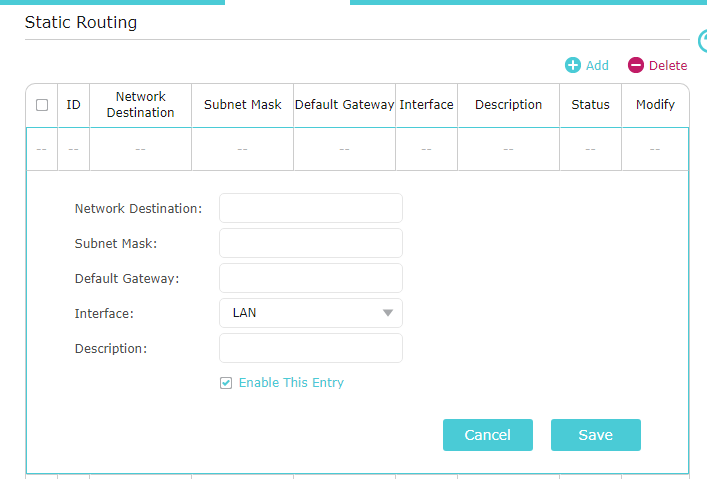
- Network Destination – the subnet of your controller — in this example
192.168.101.0(note the last number is0, not the controller's own address). - Subnet Mask –
255.255.255.0. - Default Gateway – the address of the connected FPP's wlan0 interface —
in this example
192.168.0.101. - Interface – this option may not be available; use LAN if it is.
- Description – optional, if your router offers it.
Static Routing in Computer
You can also add a static route directly on a computer. This only gives that computer access to the controller — add the route on every computer that needs it. Windows and Mac use different commands.
- Windows – open a Command Prompt as Administrator and, based on the example above, enter:
route -p add 192.168.101.0 mask 255.255.255.0 192.168.0.101
- Mac – open a Terminal window and, based on the example above, enter:
sudo route add 192.168.101.0/24 192.168.0.101
Note: The
route addcommand on a Mac is not persistent — if the computer is turned off or rebooted, the route must be added again. FPP's Creating a Proxy Host is usually a better solution on a Mac for this reason.
Creating a Proxy Host
If you cannot add a static route in your router, or you are on a Mac where routes are not persistent, use an FPP device as a Proxy Host instead — see Creating a Proxy Host for the full walkthrough, or Proxy Settings for the page reference.