FPP Settings
The FPP Settings page (Status/Control → FPP Settings) is where you set up administrative functions and settings. The settings are organized into a row of tabs across the top of the page: Playback, Audio/Video, Localization, UI, Email, MQTT, Privacy, Input/Output, Logging, Services, Storage, System and Developer.
Note
The FPP Settings page displays differently depending on your UI Level, hardware and mode. Most settings save immediately; some prompt you to Restart FPPD or Reboot before they take effect.
Searching settings. If you know what a setting does but not which tab it is on, type into the search box above the tabs. As you type, the tabs are replaced by one list of matching settings grouped under their tab name; you can change a setting right there in the results, or click a tab name to jump to that tab. Clear the box (or press Esc) to get the tabs back. The search matches each setting's name, its internal setting name, the choices in its drop‑down and its current value; tick Include tooltip text to search the help text behind each setting's help icon as well. Only settings visible at your current UI Level are searched, and the Storage tab is not included.
UI Levels
FPP has several UI Levels that show more or fewer settings so that advanced options do not clutter the screen (set on the UI tab — see below). In addition, individual settings are tagged with an icon indicating the minimum level at which they appear:
- 🎓 Advanced Level Setting
- 🧪 Experimental Level Setting
</>Developer Level Setting
Settings with no icon appear at all levels. Throughout this chapter, items marked (Advanced), (Experimental) or (Developer) are only visible at that UI Level or higher. If a setting described here is not visible, raise your UI Level.
Playback
Configures general playback behaviour.
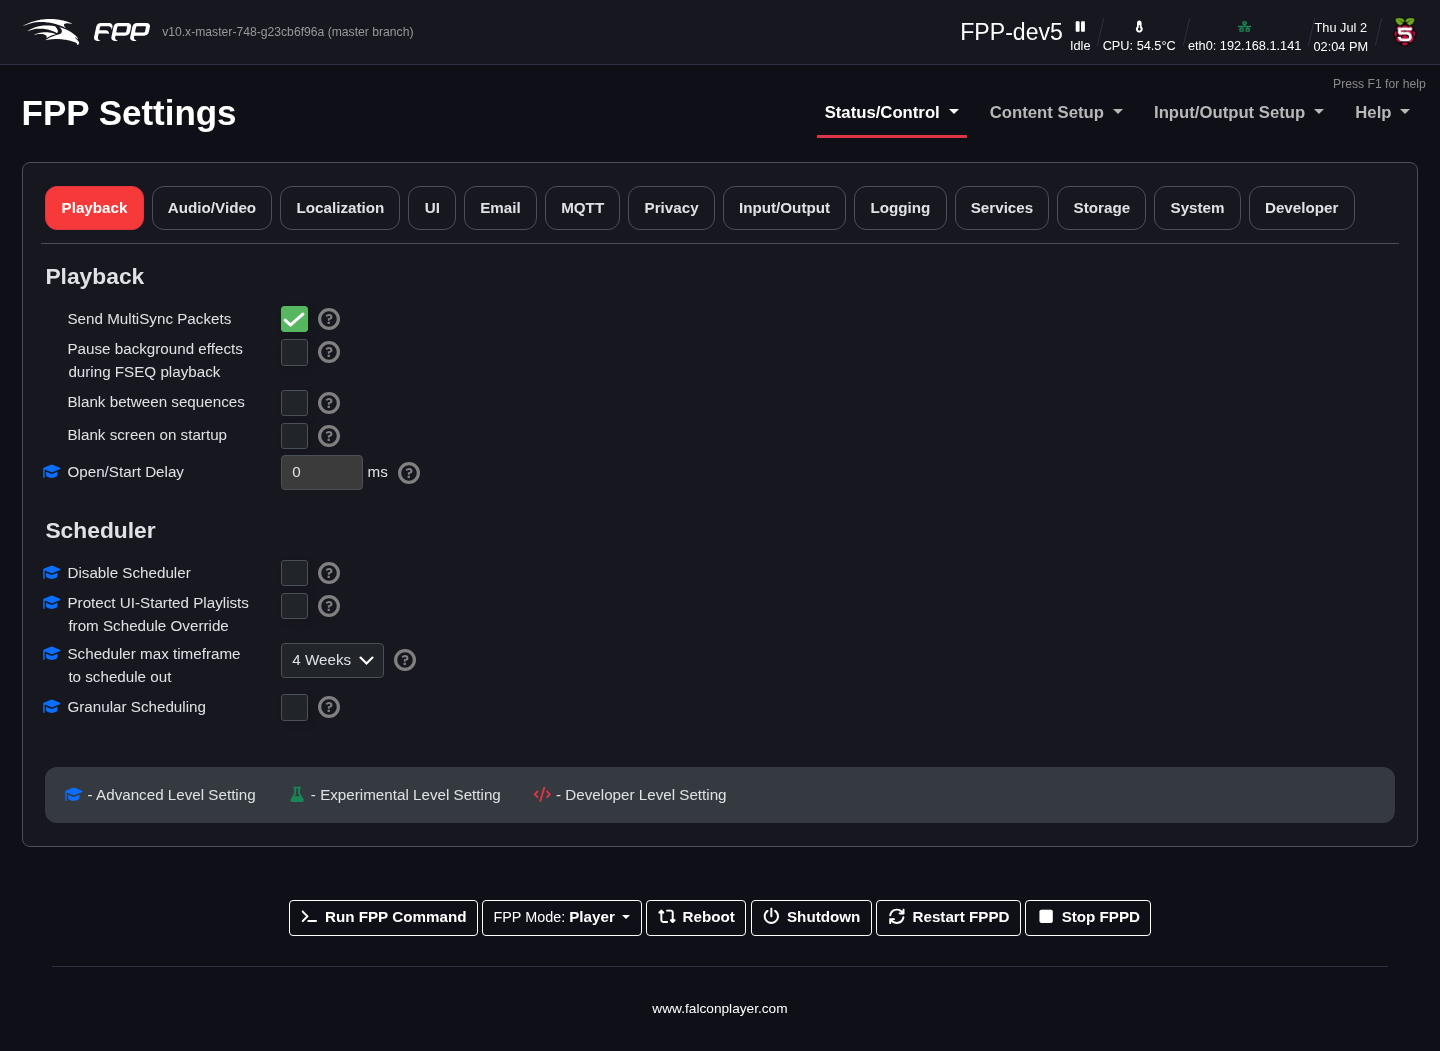
- Send MultiSync Packets (Player mode only) – send MultiSync packets to remote devices (see MultiSync).
- Pause Background Effect Sequence during FSEQ playback – effect sequences normally take priority over FSEQ files; select this if you want the FSEQ file to take priority over a background effect sequence.
- Blank between sequences – send blanking data to turn the pixels off between items.
- Blank screen on startup – By default, FPP will display system data to the HDMI port when it boots up and will remain until other data is sent out to the HDMI port. The screen blanking will turn the text console off after one minute so that it does not remain on the monitor. If you are using this FPP to play video through the HDMI port, then you probably want to enable this setting. (This option is only available on Pi based FPP devices as the HDMI port is disabled on BeagleBone based systems)
- Inactivity timeout for screen blanking – when Blank screen on startup is enabled, blank the screen after this many minutes with no activity. (Developer.)
- Open/Start Delay – a delay (ms) before playback begins.
- Local Media/Sequence Offset – trims the synchronization between media and sequences on this device, in milliseconds. A positive value moves the media ahead, a negative value moves it back. Requires an FPPD restart. (Advanced.)
- Remote Media/Sequence Offset – the same trim applied to an FPP remote, in milliseconds. Requires an FPPD restart on the remote. (Advanced.)
Warning: Both offsets apply to every media file, not one at a time. If individual files need different offsets, fix the audio files or sequences themselves rather than using these settings.
- Ignore Media Sync Packets – on a remote, start and stop media when the player says so, but make no attempt to keep it in sync during playback. The media runs more smoothly but may drift away from the player. (Advanced.)
Scheduler sub‑settings:
- Disable Scheduler – globally turn scheduling off.
- Protect UI‑Started Playlists from Schedule Override – stop a scheduled item interrupting a playlist you started by hand.
- Scheduler max timeframe to schedule out – how far ahead the schedule is calculated (this governs the Status page's schedule Preview range).
- Granular Scheduling – finer‑grained schedule control.
Audio/Video
The Audio/Video tab is substantially expanded in FPP 10, which uses a PipeWire‑based audio/video pipeline (with GStreamer) for flexible routing.
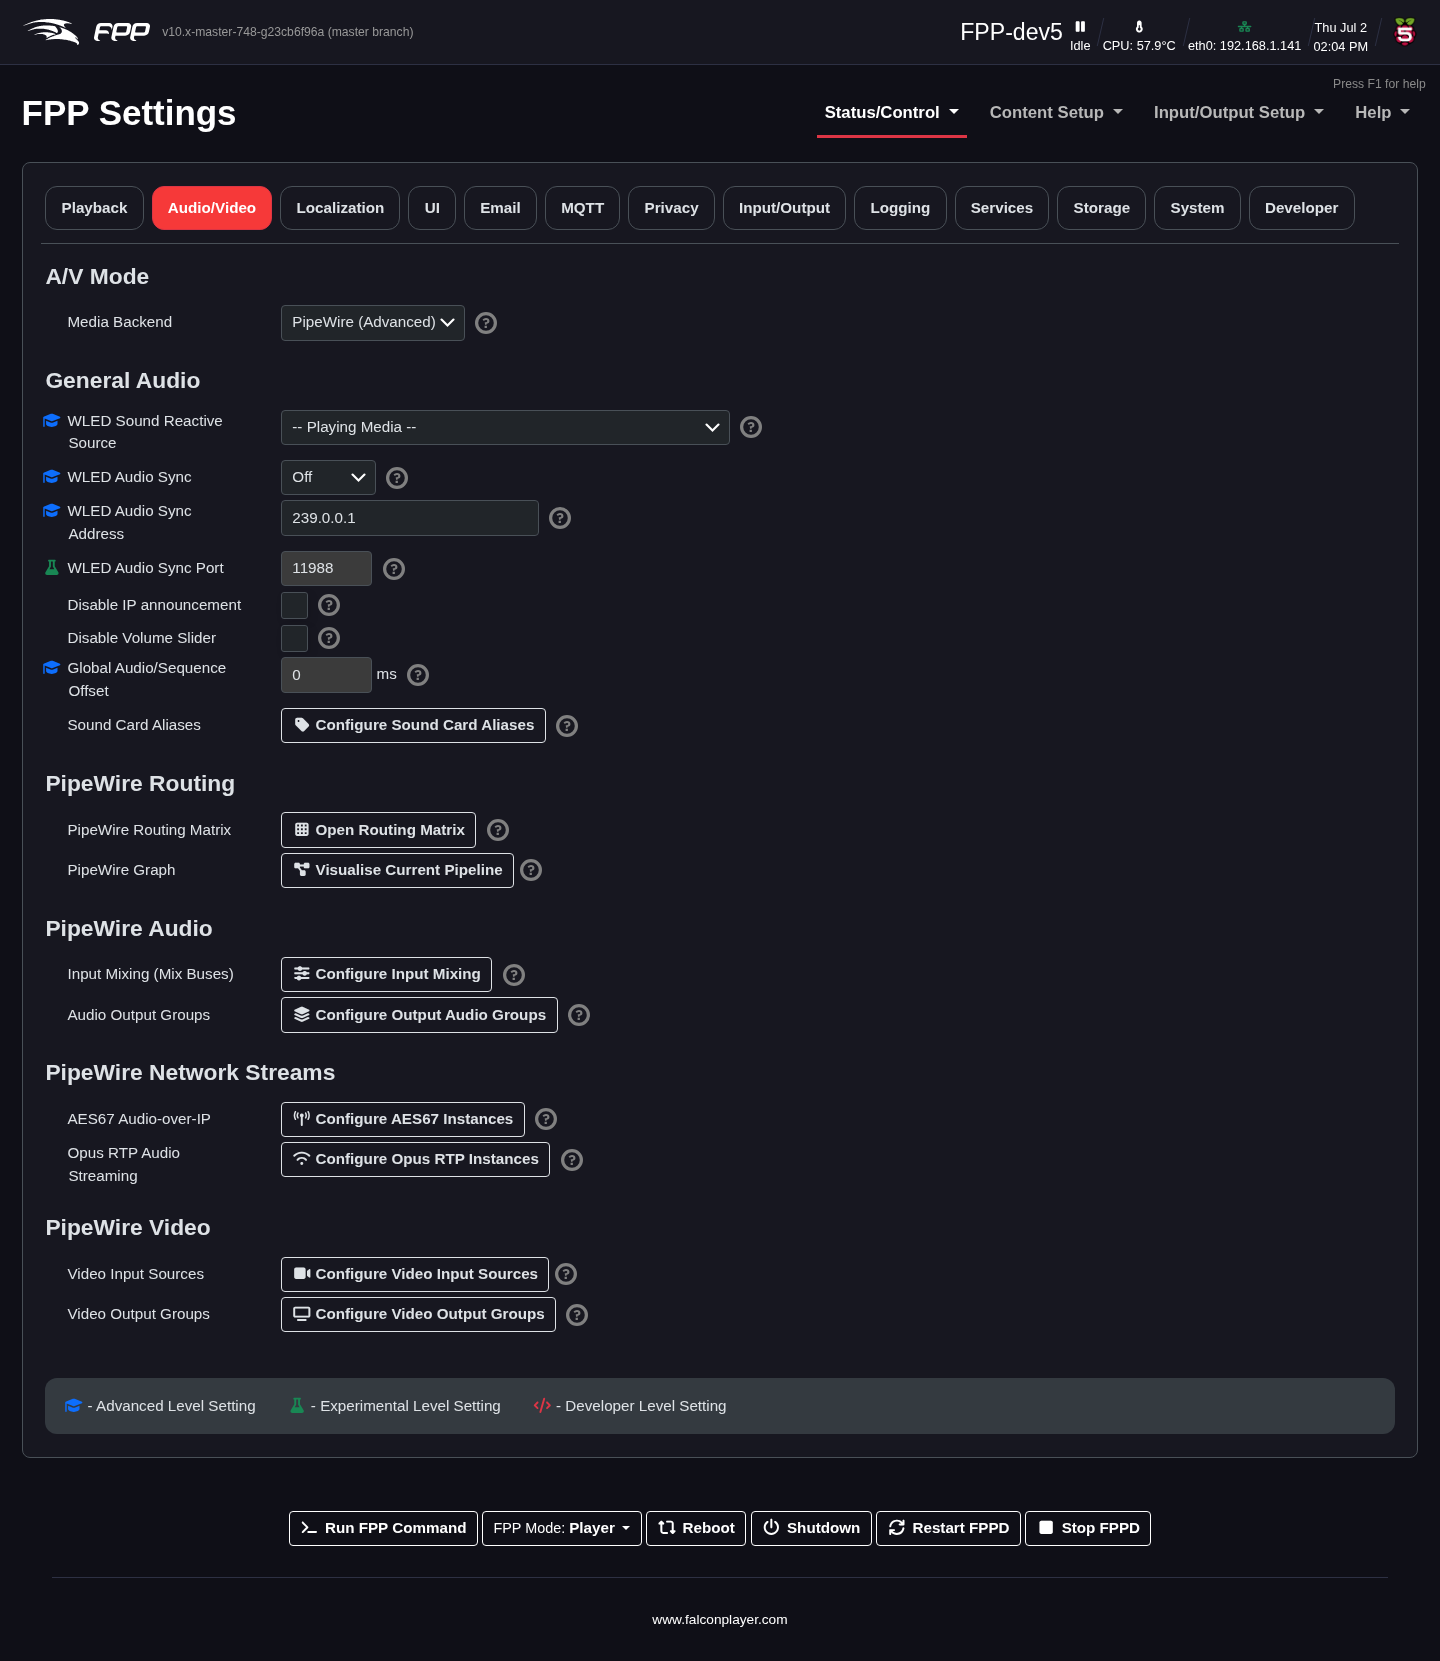
- A/V Mode → Media Backend – selects the media backend. Simple Pipewire is the default setting for most systems. PipeWire (Advanced) enables the full routing capabilities but is an advanced concept. See PipeWire
- Audio Output Device – which device audio plays through: on‑board analogue audio, a Raspberry Pi's HDMI output, or a USB sound card. FPP stores the choice by the sound card's stable ALSA name rather than its index, so it survives cards being probed in a different order (for example a USB device being added or removed).
- Default Video Output Device – where video plays by defaul (Advanced)** enables the full routing capabilities below.
- Audio Output Device – which device audio plays through: on‑board analogue audio, a Raspberry Pi's HDMI output, or a USB sound card. FPP stores the choice by the sound card's stable ALSA name rather than its index, so it survives cards being probed in a different order (for example a USB device being added or removed).
- Default Video Output Device – where video plays by default. On every FPP system a video in a playlist can be shown on a Pixel Overlay model; on a Raspberry Pi it can also go to the HDMI or composite outputs.
- Audio Sample Rate – the rate PipeWire's audio graph runs at. The Default uses 44100 unless the selected sound card clocks at something else; 44100, 48000 and 96000 can be forced. The bit depth is not set here — FPP probes the card and uses the widest format that holds the rate. (Advanced.)
- Audio Period Size – how many samples PipeWire hands the sound card at a time (the graph quantum), from 1024 up to 8192. Smaller values lower latency; larger values are less likely to glitch on a busy player. (Advanced.)
Note
In PipeWire (Advanced) mode these two are set per card in the PipeWire Audio Groups settings instead — see PipeWire Audio & Video Pipeline
- Force Audio Card ID – override the card ID that FPP normally reads from the
sound card's
idfile. Occasionally that ID is wrong; setting it by hand can clear the error "Could not open audio device — ALSA: Couldn't open audio device: Invalid argument". (Experimental.) - Hardware Decoding – use the hardware video decoder. Turning it off greatly increases CPU use but can give finer control over the video output. (Advanced.)
- Force HDMI Display – force a Raspberry Pi to treat HDMI as the default display. Sometimes needed when the display is not detected properly, or is not powered on when the Pi boots. While this is on, the Pi's composite output cannot be used.
- Force HDMI Resolution (and Force Port 2 HDMI Resolution on a Pi with two HDMI ports) – pin the output to a given resolution instead of whatever the monitor reports at boot.
- General Audio – master audio behaviour, including Global Audio/Sequence Offset (a fine sync trim in ms) and Disable Volume Slider. Configure Sound Card Aliases gives friendly names to audio devices.
- Keep Audio Output Open – keep FPP's audio output running all the time, instead of starting it when media is about to play and stopping it a few seconds afterwards. Media that starts with no warning — a sound effect triggered by a GPIO input, a command or the API — then plays without the start‑up delay, which can be most of a second on a BeagleBone. Scheduled playlists and back‑to‑back media already avoid that delay, so most shows do not need it; it costs a little CPU all the time because the sound card never idles. Takes effect immediately. (Advanced.)
- WLED Sound Reactive – drives sound‑reactive effects on WLED devices from
FPP's audio:
- WLED Sound Reactive Source – where the sound‑reactive data comes from; the default is the media FPP is currently playing. (Advanced.)
- WLED Audio Sync Address – where sync packets are sent, and in receive
mode the multicast group to join. 239.0.0.1 is WLED's default multicast
group; use a unicast address (e.g.
192.168.1.70) or a broadcast address (e.g.192.168.1.255) on networks where multicast is filtered. (Advanced.) - WLED Audio Sync Port – the UDP port, default 11988. Only change it if you have reconfigured your WLED devices. (Experimental.)
- Suspend Audio Device When Idle – lets PipeWire suspend the sound card while nothing is playing. Left on (the default), it saves roughly 4–5% of a CPU core on single‑core boards, because the audio graph would otherwise run continuously and keep the card clocked. Turn it off if your sound card does not resume cleanly when playback starts. (Advanced; requires a reboot.)
- PipeWire Routing – Open Routing Matrix to patch audio sources to outputs, and Visualise Current Pipeline to see a live PipeWire graph.
- PipeWire Audio – Configure Input Mixing (Mix Buses) and Configure Output Audio Groups to combine and split audio across multiple outputs.
- PipeWire Network Streams – AES67 Audio‑over‑IP, Opus RTP Audio Streaming and VBAN Audio Streaming for sending/receiving audio over the network. The AES67 page also holds the device‑wide PTP clock settings (enable, interface, domain and clock role), and the pages show live per‑stream status. VBAN is the protocol used by Voicemeeter and the VB‑Audio tools.
- PipeWire Video – Configure Video Input Sources, Configure Video Output Groups and Configure RTSP Outputs for HDMI/video routing, video‑to‑pixel mapping and serving a video output (with its audio) as an RTSP stream.
Note
Each of these buttons opens a dedicated configuration page with substantial functionality of its own. The whole pipeline — sound card aliases, audio output groups (delay/EQ per card), input mixing, the routing matrix, the live pipeline graph, AES67, Opus RTP and VBAN audio streaming, video input/output groups and RTSP outputs — is documented in its own chapter, The PipeWire Audio & Video Pipeline, which immediately follows this one. (It replaces the simpler Audio/Video settings of FPP 9.x.)
Localization
Configures time and location. For playlists to start automatically at scheduled times, the scheduling FPP (not the remotes) must keep accurate time. Without internet access you can set the date and time manually, but without a Real‑Time Clock (RTC) or internet the time resets on reboot.
Time Config:
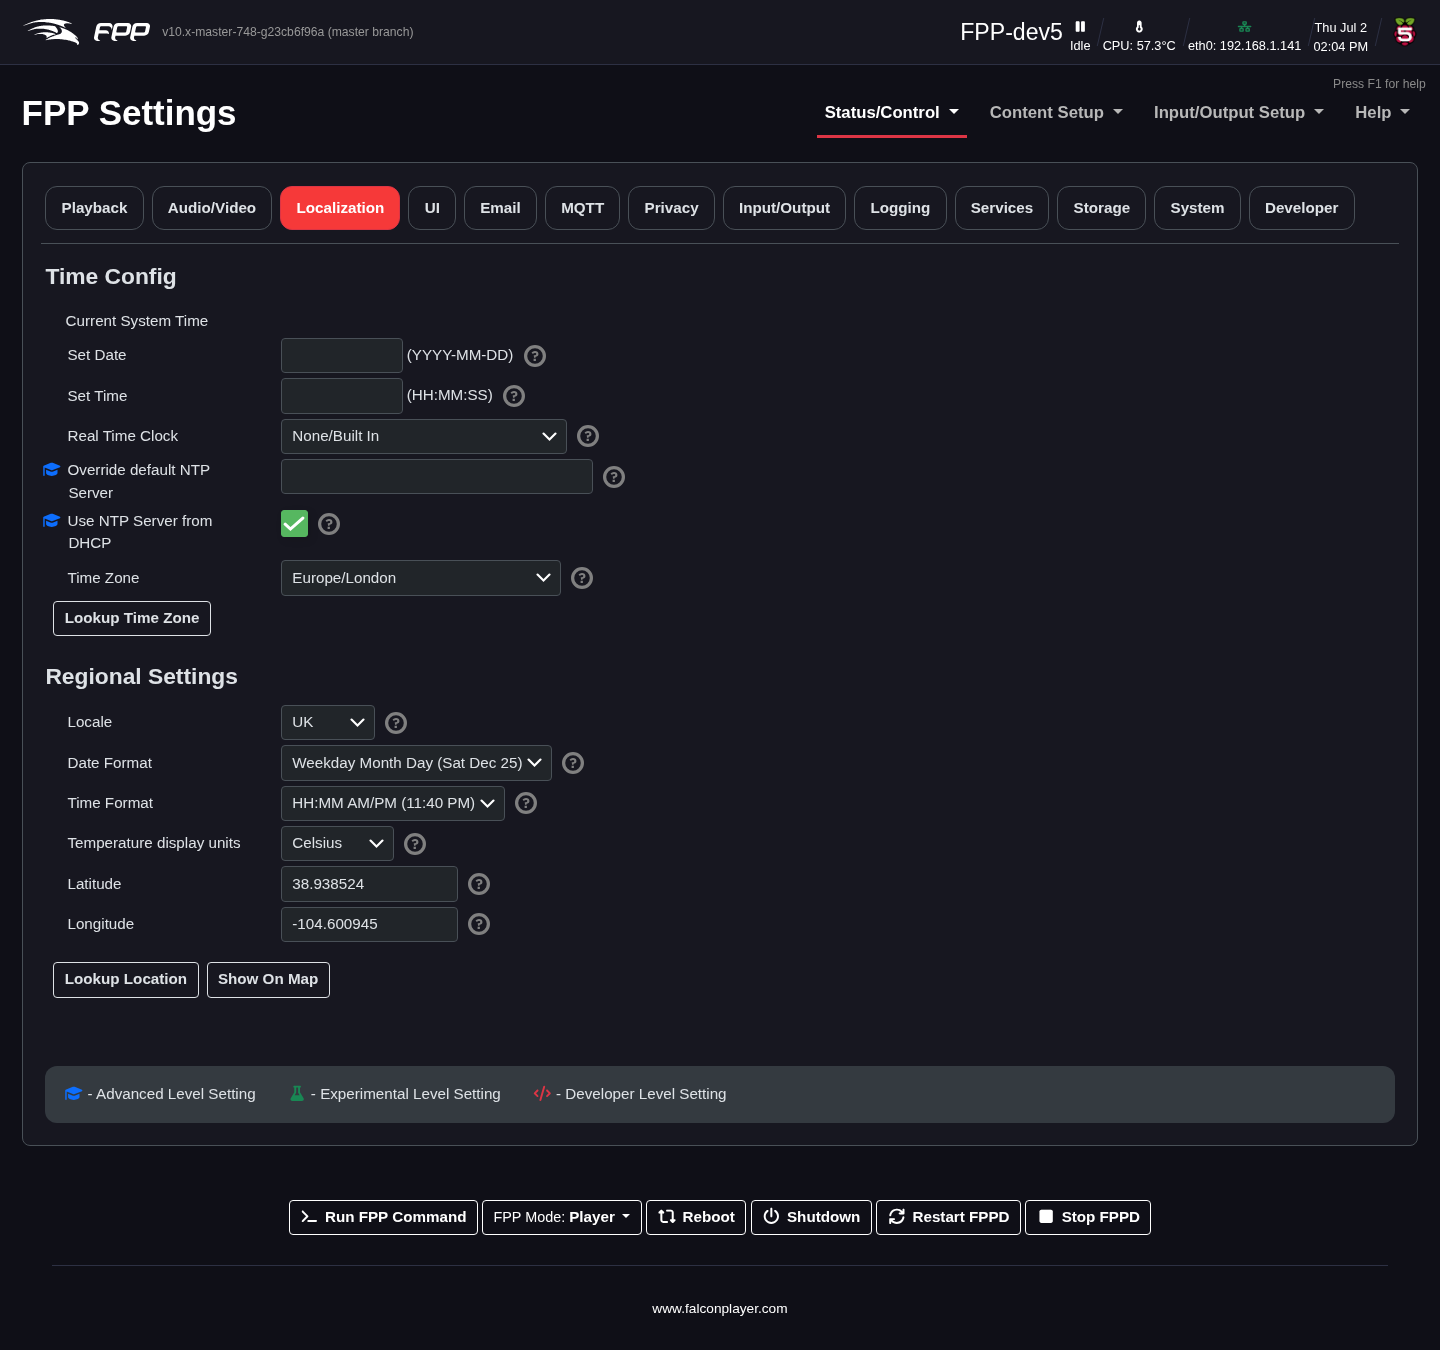
- Current System Time – the current date, time and configured time zone.
- Set Date / Set Time – set these manually when there is no network.
- Real Time Clock – if a cape/hat with an RTC is attached, select it from the list (FPP tries to detect it), reboot, then set the time here.
- Disable Pi 5 Built‑in RTC – a Raspberry Pi 5 has its own real‑time clock, but it only keeps time across a power cut if a battery is fitted to the Pi's RTC header. Without a battery it still claims the first clock device and sets the system time from it early in boot, before FPP can read a cape's clock. If there is no battery on the Pi's header, tick this so the cape's RTC is the only clock used. (Pi 5 only; requires a reboot.)
- Use NTP Server from DHCP – let your DHCP server supply the time server, overriding the one configured below. Off by default, in which case only the configured NTP server is used. (Advanced.)
- Override default NTP Server – normally left blank; enter a different time server's IP only in special cases. (Advanced.)
- Time Zone – required so an NTP‑synced clock shows the correct local time.
- Lookup Time Zone – detect your time zone (requires internet).
Regional Settings:
- Holiday List – which country's holidays the Scheduler knows about, so a playlist can be scheduled on Thanksgiving or Boxing Day without working out the date each year. That is all it does — it does not change the language, time zone, or how dates and numbers are shown. Pick Global for no country‑specific holidays. (Earlier versions called this setting Locale.)
- Date Format / Time Format – how dates and times are displayed.
- Temperature Display Units – Fahrenheit or Celsius.
- Latitude / Longitude – required for sunrise/sunset scheduling. Use Lookup
Location (verify with Show on Map), or obtain coordinates from
LatLong.netor Google Maps (in Google Maps they follow the@in the address bar, latitude first; keep any minus sign).
UI
Changes the appearance and behaviour of the web interface.
User Interface:
- Temporary User Interface Level – shown when you are at the Basic level. The Change to Advanced UI for 15 Minutes button raises the interface to Advanced for the rest of your browser session, without permanently changing your UI Level — useful when you need to reach one Advanced setting and would rather not leave the extra clutter switched on. While the override is active an unlock icon appears in the page header showing roughly how many minutes are left; click it, or Exit Advanced Mode here, to return to Basic immediately. The override is per‑browser and expires by itself.
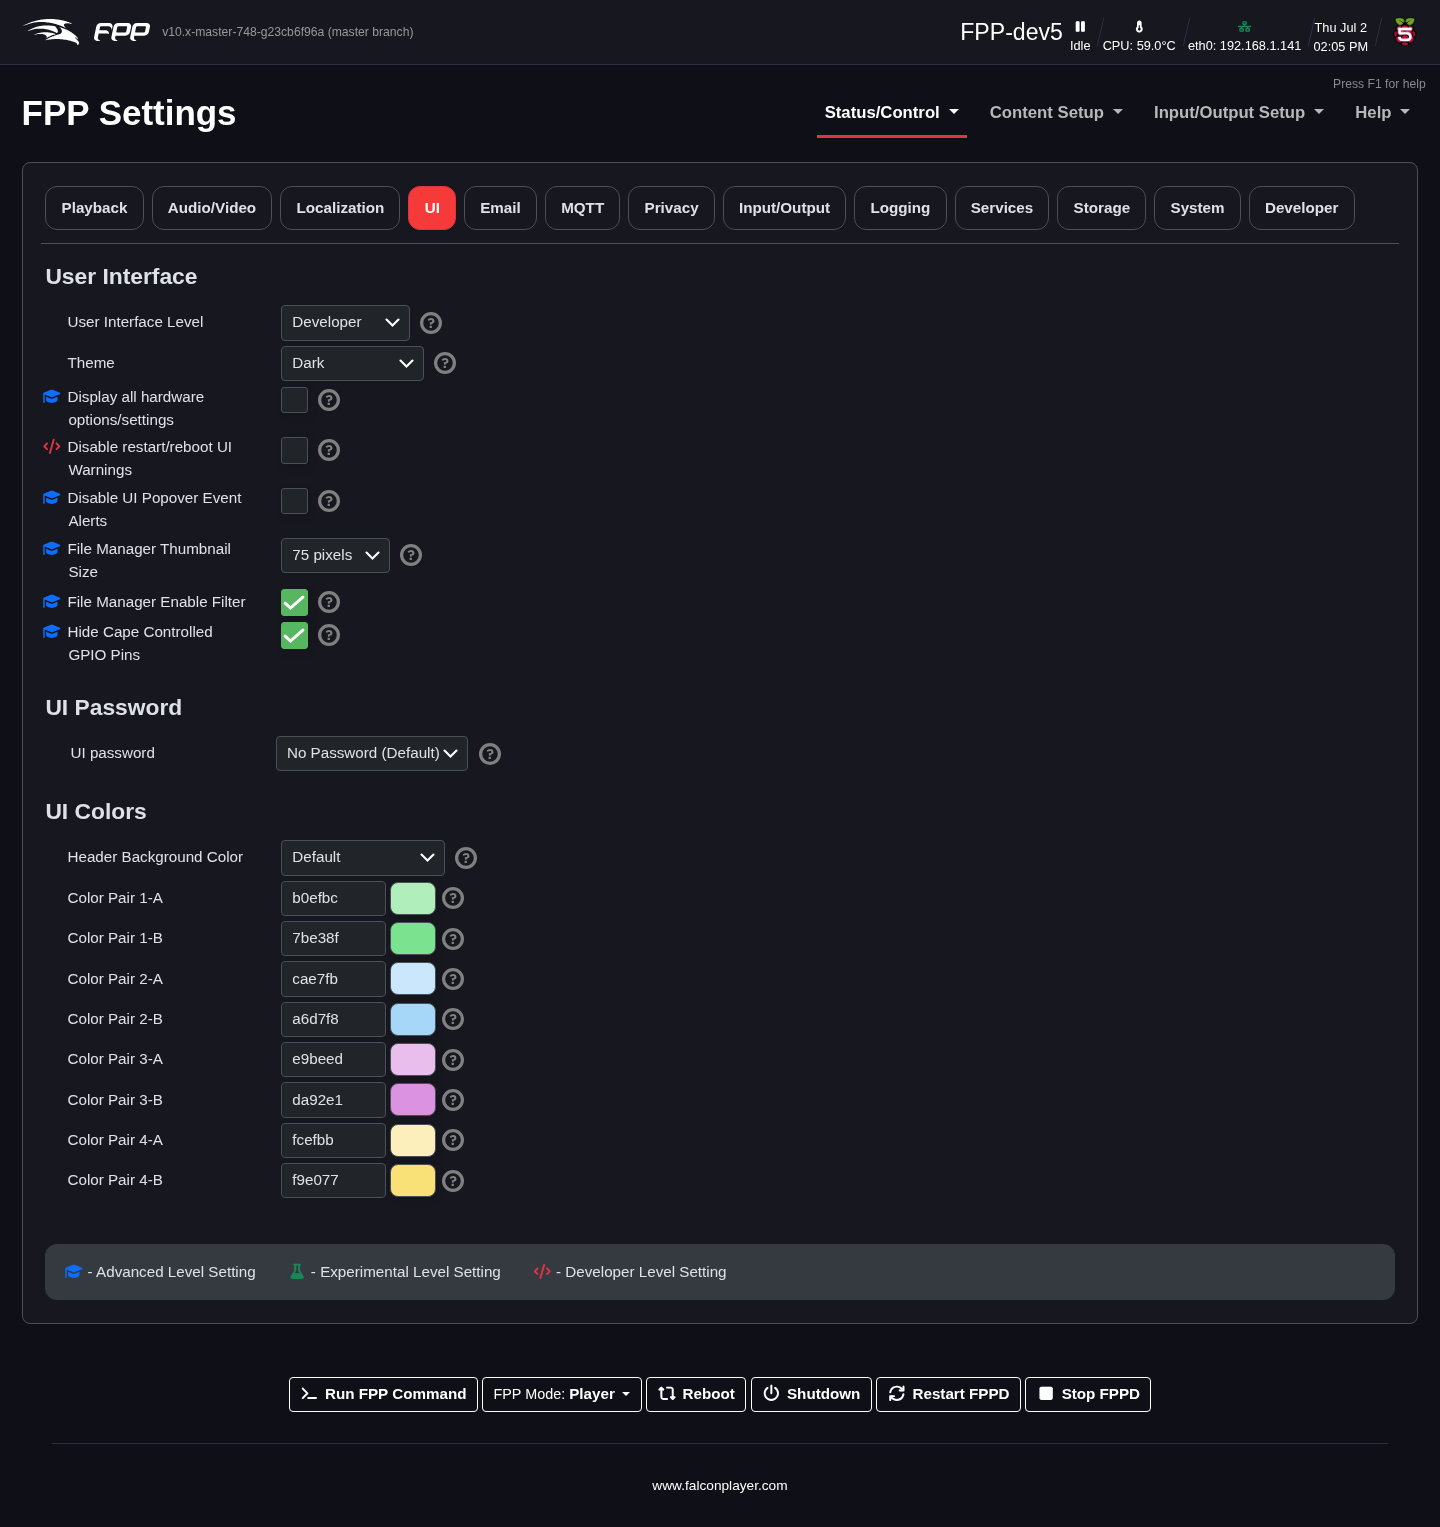
- User Interface Level – four levels that tailor how much is shown:
- Basic – all the settings most users need; the recommended setting.
- Advanced – extra features/settings for unusual configurations.
- Experimental – settings still in testing; changes may not work correctly until fully tested.
- Developer – settings used by developers for testing; changing these can cause problems if misconfigured.
- Display all hardware options/settings – show settings for all devices, even those not detected. Enabling this lets you change settings that could cause problems. (Advanced.)
- Disable restart/reboot UI Warnings – for developer testing; you may then not be warned when a reboot/restart is required. (Developer.)
- File Manager Thumbnail size – size of image thumbnails in the File Manager. (Advanced.)
- File Manager Enable Filter – toggle the File Manager's sort/filter header to free up screen space.
- File Manager Hide Empty Tabs – hide File Manager tabs that contain no files. A tab reappears as soon as a file of that type is uploaded, and the tab you are on is never hidden. (Advanced.)
- Theme – controls the web interface's appearance. System Default follows your browser or operating system's dark‑mode preference; Light and Dark override it and always use that theme.
- Disable UI Popover Event Alerts – suppress the alert popovers that appear at the top right when an event fires. These alerts are useful feedback, so turn them off only for special cases such as a kiosk or a display screen. (Advanced.)
UI Password:
- UI Password – by default no password is required (the UI is only reachable from your local network). Setting one is for advanced users, as it can disable some FPP functionality without extra configuration. The password must be at least 8 characters; once set, log in with username admin and your password. (Defaults: username admin, password falcon.)
UI Colors:
- Header Background Color – colour the header to tell devices apart at a glance.
- Color Pairs – the colours used in tables such as the Schedule Preview, making scheduling problems easier to spot.
Keyboard Shortcuts
FPP has a few system shortcuts that work on every page:
| Key | Action |
|---|---|
| F1 | Help for the current page (press again, or Esc, to close). Cannot be changed. |
| F2 | Open FPP Settings — unless you assign a custom shortcut to F2. (On the Pixel Strings tab of Channel Outputs, F2 instead sets the next string's start channel.) |
| F8 | Open or close the Diagnostic Report wizard — unless you assign a custom shortcut to F8. |
| Esc | Close the Help or Diagnostic Report window. Cannot be changed. |
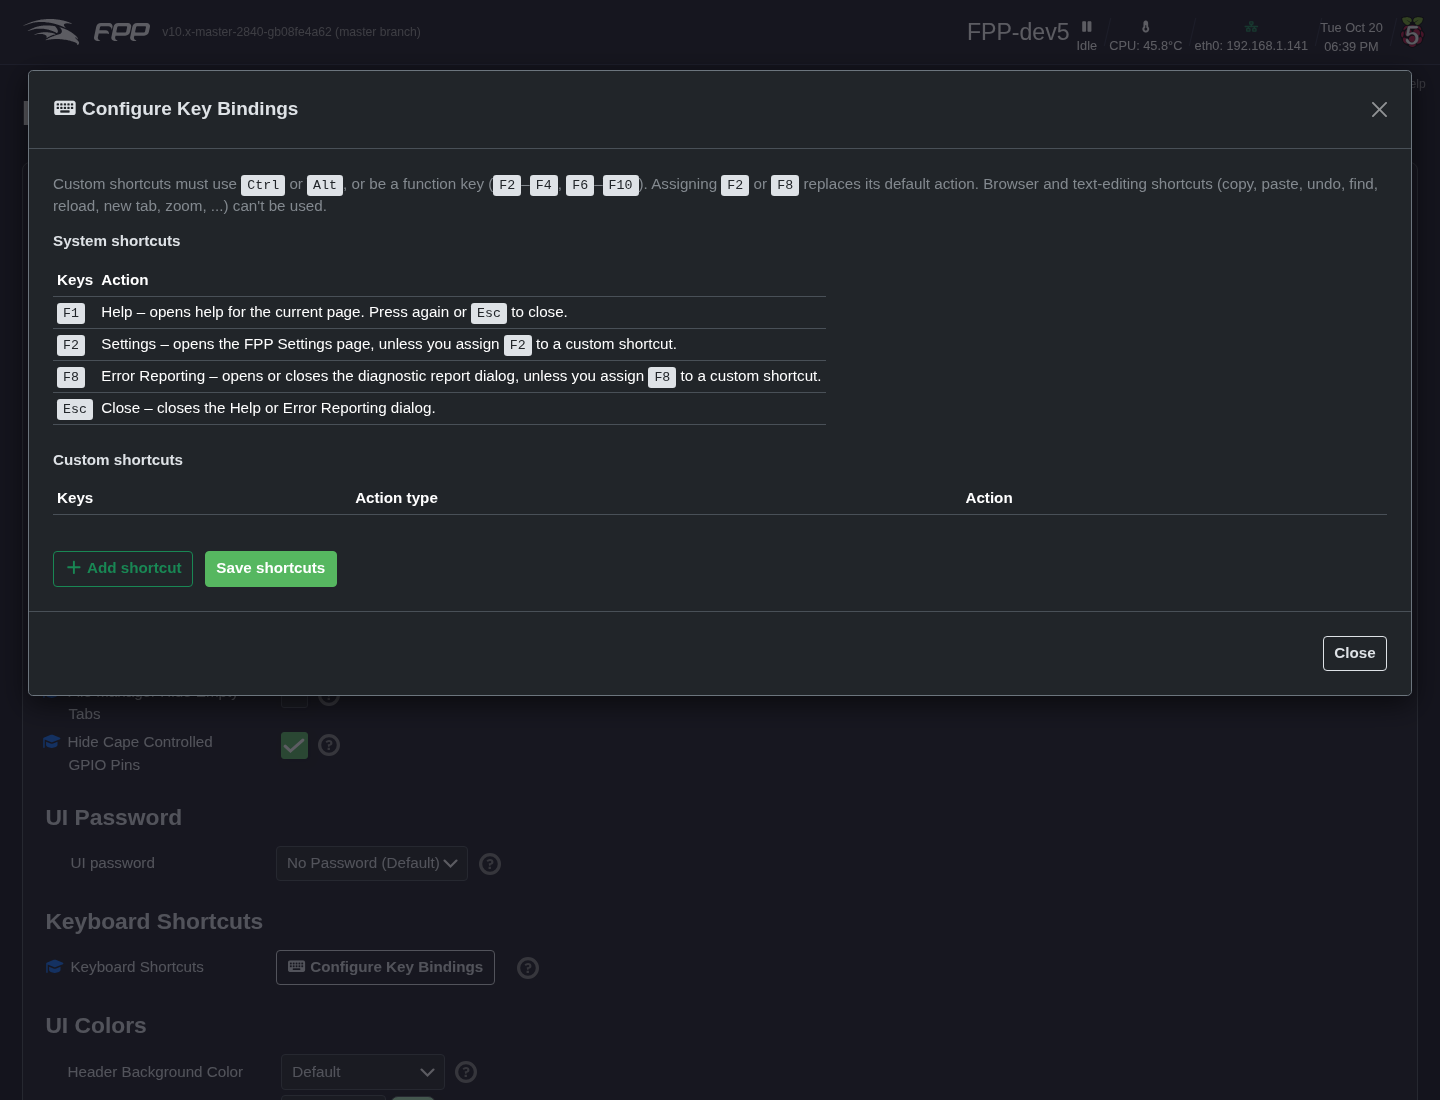
(Advanced.) Configure Key Bindings opens a dialog listing those system shortcuts and your own custom shortcuts, which also work on every page. For each custom shortcut:
- Keys – click the field, then press the combination. It must use Ctrl or Alt with another key, or be a function key (F2–F4, F6–F10). Browser and text‑editing shortcuts (copy, paste, undo, find, reload, zoom …) are refused, since taking them over would break them everywhere. Esc cancels recording; Backspace clears the field.
- Action type – Command preset triggers one of your Command Presets by name; FPP command runs any command with the arguments you enter; Page opens an FPP page.
- Test (play button) – run that row's action now, without pressing the keys.
Save shortcuts checks for empty, reserved or duplicate keys and saves them; they apply on every page straight away, with nothing to restart.
Tip
For a command with complicated arguments, save it as a Command Preset first and bind the preset — the preset editor gives you the full argument editors.
Email
Lets FPP send email (via FPP commands or a script).
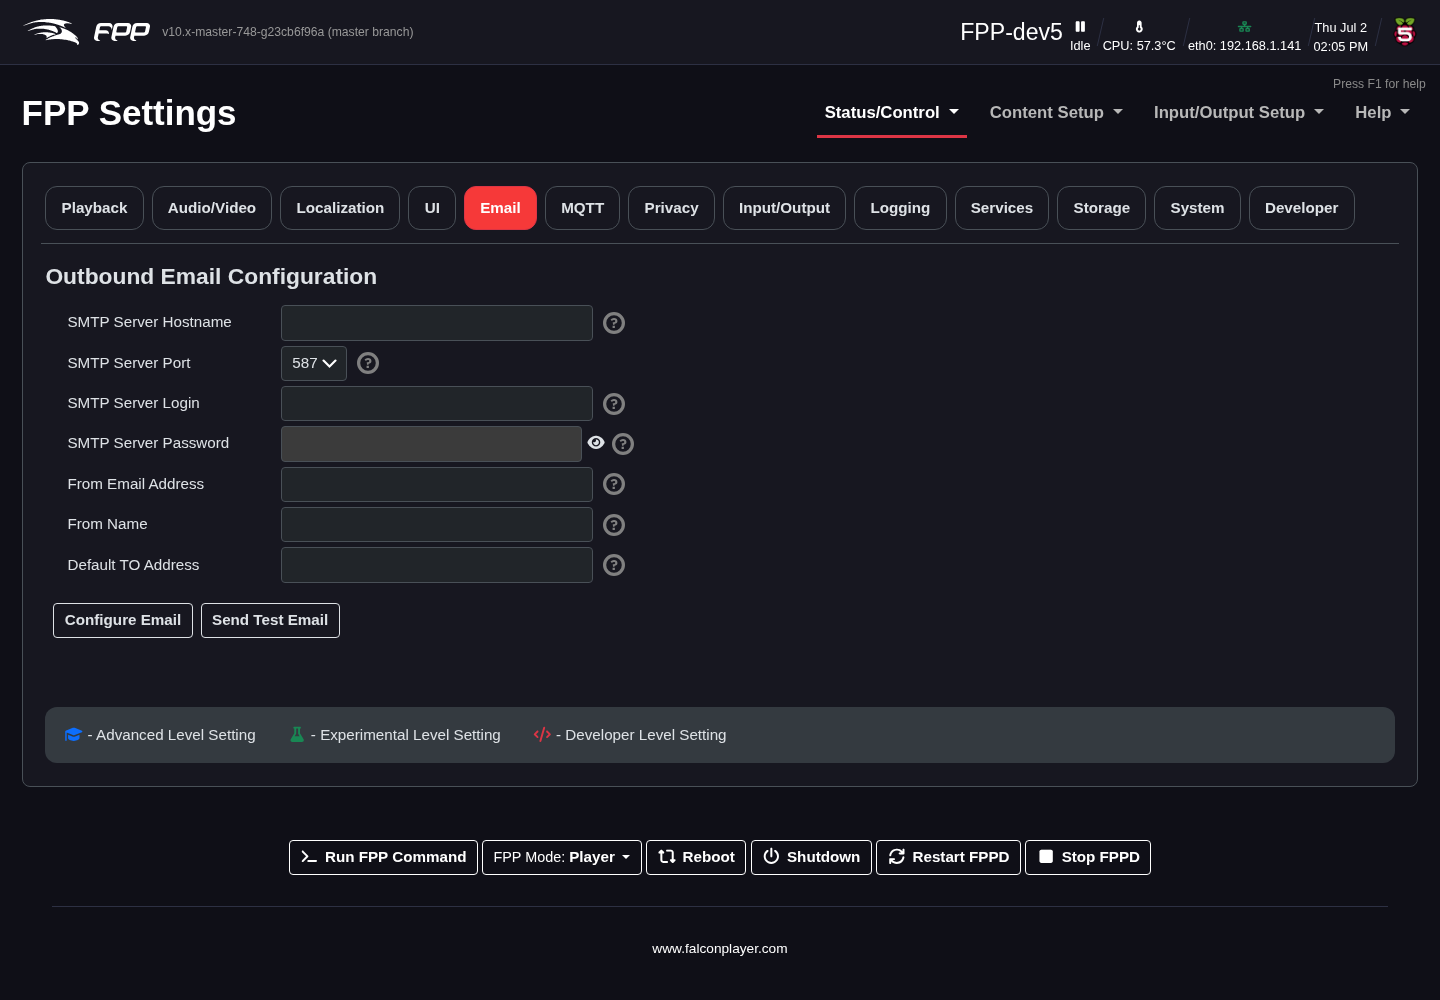
- SMTP Server Hostname / Port – your mail server and port (587 is most common; 465 and 25 are also used).
- SMTP Server Login / Password – credentials for the sending account.
- From Email Address / From Name – the sender shown on the email (the From Name could be the FPP host name).
- Default TO Address – the default recipient.
- Configure Email saves the settings; Send Test Email tests them.
Note
Some providers (e.g. Gmail, Yahoo) block third‑party clients by default; you may need to adjust their security settings to allow FPP to send.
MQTT
Connects FPP to an MQTT broker for automation (e.g. a home‑automation system).
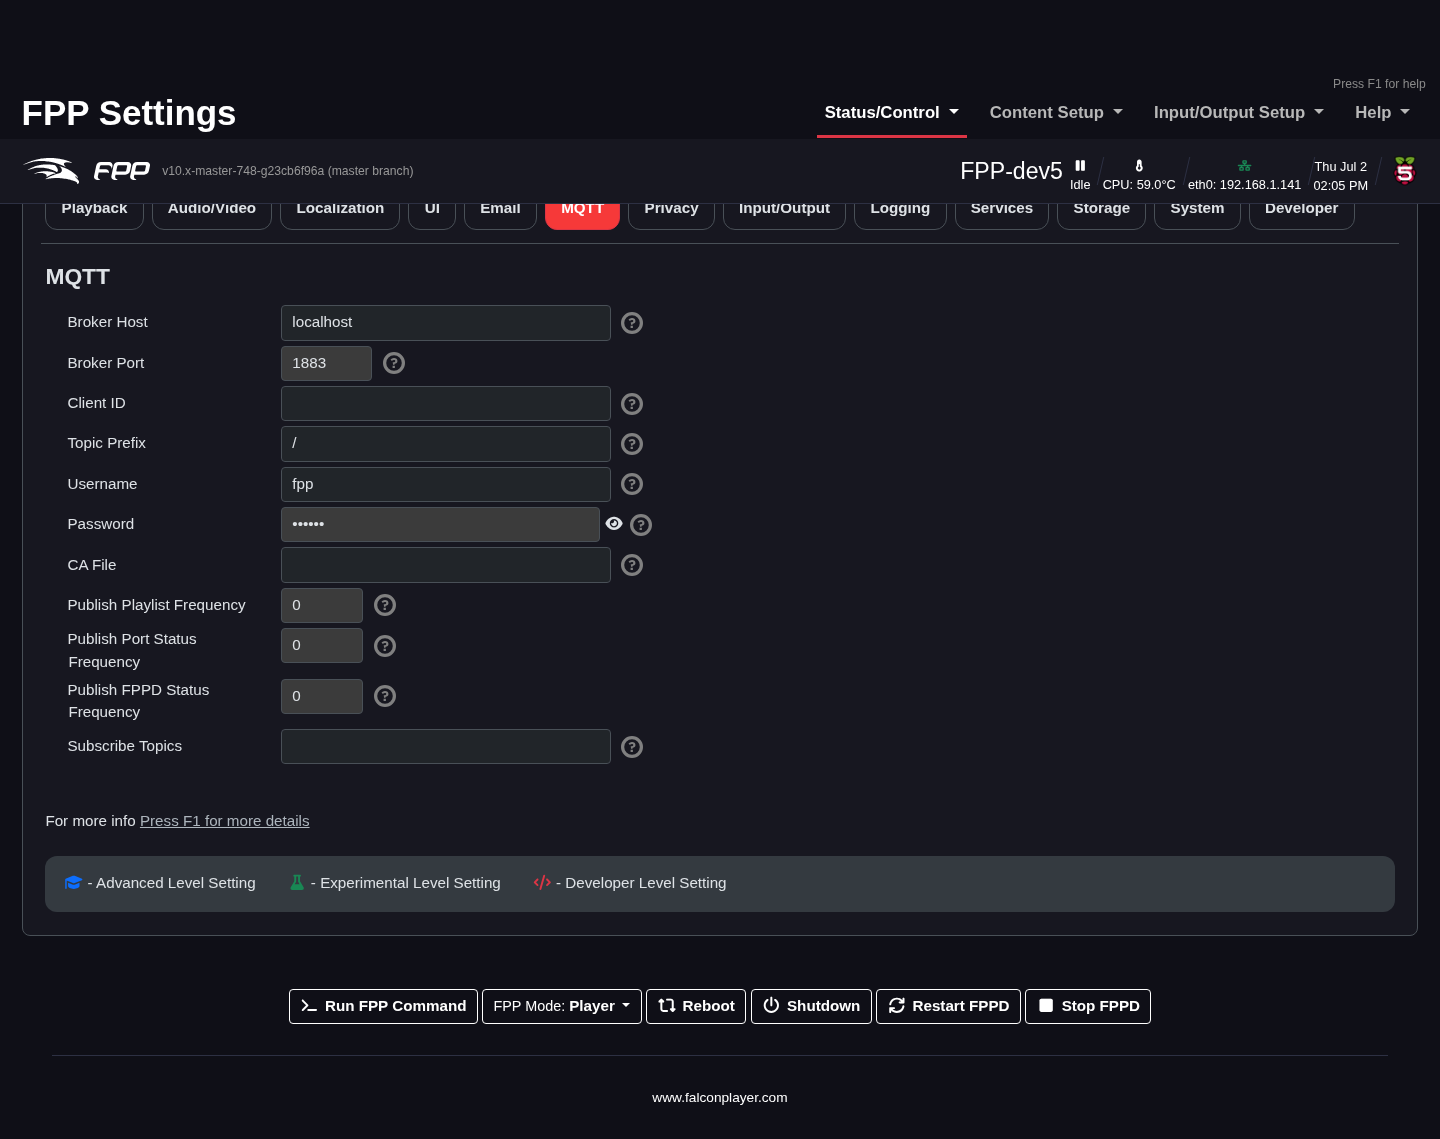
- Broker Host / Port – the broker's address and TCP port.
- Client ID – left blank, the broker assigns one.
- Topic Prefix – prefix used when publishing messages.
- Username / Password – broker authentication.
- CA File – optional CA to validate the broker's certificate (only for SSL with self‑signed certificates).
- Publish Playlist Frequency – how often, in seconds, to publish playlist status to the broker. 0 means it is not published on a timer, but is still available on demand.
- Publish FPPD Status Frequency – how often, in seconds, to publish the FPPD status JSON. 0 disables periodic publishing.
- Publish Port Status Frequency – how often, in seconds, to publish port monitoring status JSON (on capes that report it). 0 disables it.
- Subscribe Topics – one or more additional topics to subscribe to. Use
#on its own to subscribe to everything the broker publishes, a prefix filter such assmartthings/#for a whole tree, or an exact topic for just one. Separate several with a semicolon (;).
Tip
Anything received on a subscribed topic shows up on the Variables page under MQTT Read‑only Variables, so you can act on it with an If command — see Variables.
Privacy
FPP's developers are cautious about privacy and let you choose exactly what, if anything, leaves the device. The Privacy tab shows the same table as the privacy step of the setup wizard, and the two save the same way.
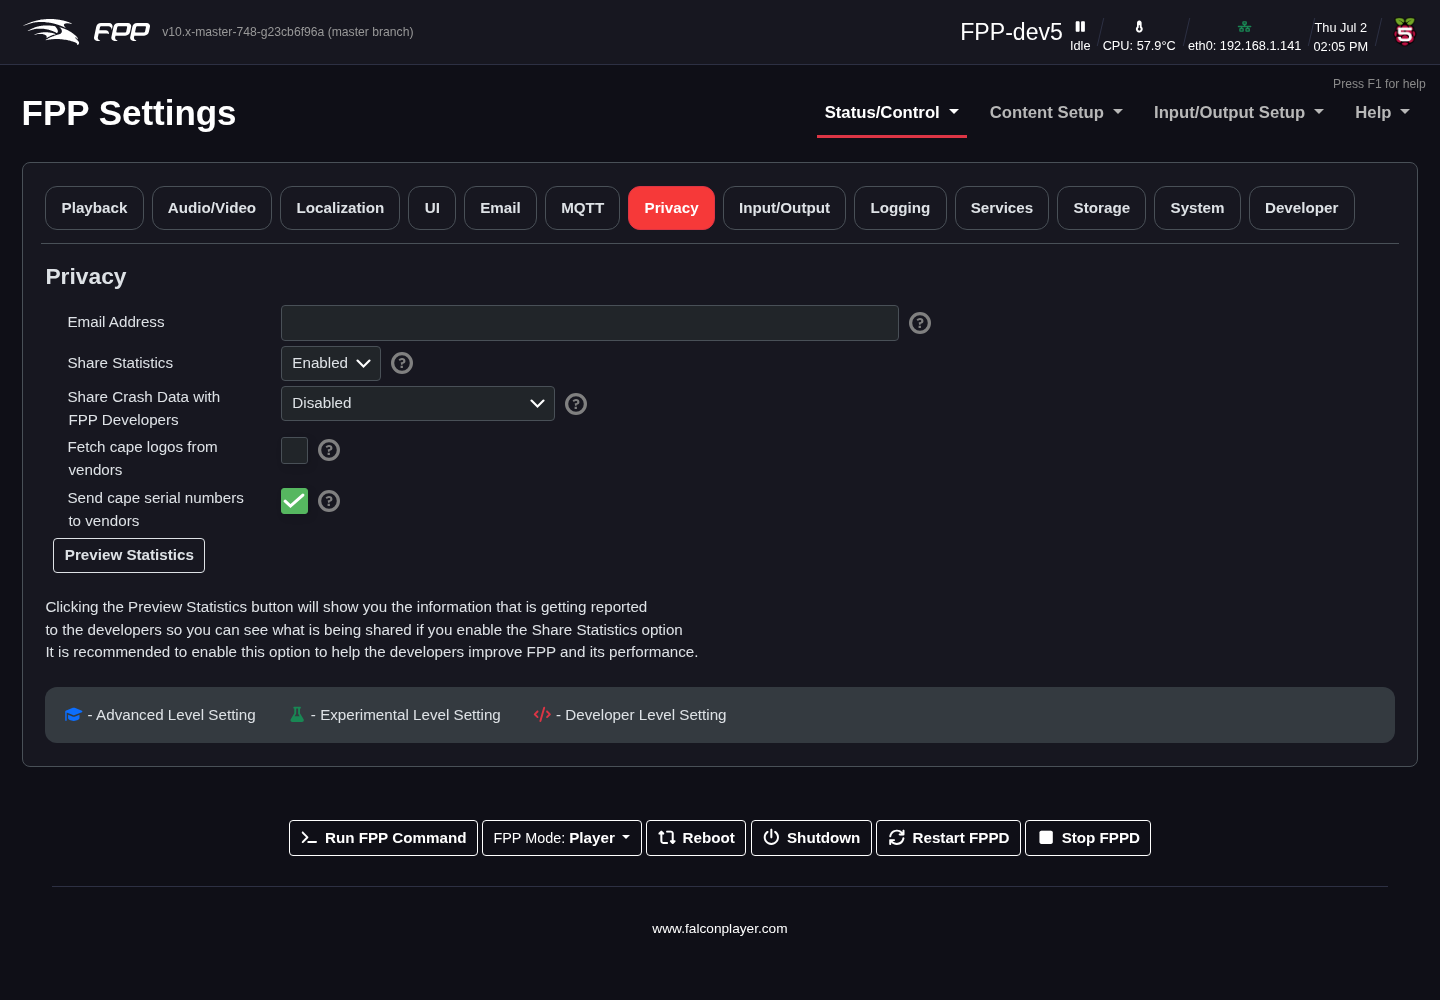
Each row is one thing FPP could send, who it goes to, and a plain Allow / Deny choice. Indented rows are an extra on top of the row above them — allowing an indented row implies allowing its parent, and denying the parent denies it too.
- Share usage statistics (to the FPP and xLights developers) – anonymous statistics about platforms and features, so the developers keep supporting what people actually use. Click Preview data to see exactly what would be sent; nothing is sent until you allow it.
- Load cape logos from vendor website (to the cape vendor) – with a cape
fitted, FPP shows the vendor's logo, which means fetching it from their site and
so revealing your IP address to them.
- …and include your cape's serial number – adds the serial number to that request so the vendor can identify the cape.
- Send crash reports (to the FPP and xLights developers) – if FPPD crashes, a
report is built and sent. This is how most crashes get found and fixed.
- …and include your settings – a scrubbed copy of the settings, so the developers can reproduce the configuration that crashed.
- …and include configuration and logs – channel configuration and recent logs as well. Passwords, Wi‑Fi keys, addresses and location are redacted, and the network interface configuration is never included.
- E‑mail address (optional) – a contact for crash follow‑up only, shown once crash reports are allowed. Leave it blank to stay anonymous.
Allow all / Deny all set every row at once; you can then change individual rows back. There is no Apply button — each change saves immediately, and FPP also records that you made the choice (a withdrawal is recorded just like a consent).
Note
FPP keeps crash reports on the device even when you choose not to send them, so you can look at one yourself or send it later from File Manager → Crash Reports or the Diagnostic Report wizard.
Note
The Legal Jurisdiction you choose in the setup wizard decides whether these questions start unanswered or pre‑filled: some regions require a device to ask before it sends anything. It does not change what any setting does.
Input/Output
Global input/output settings (Advanced UI Level or higher).
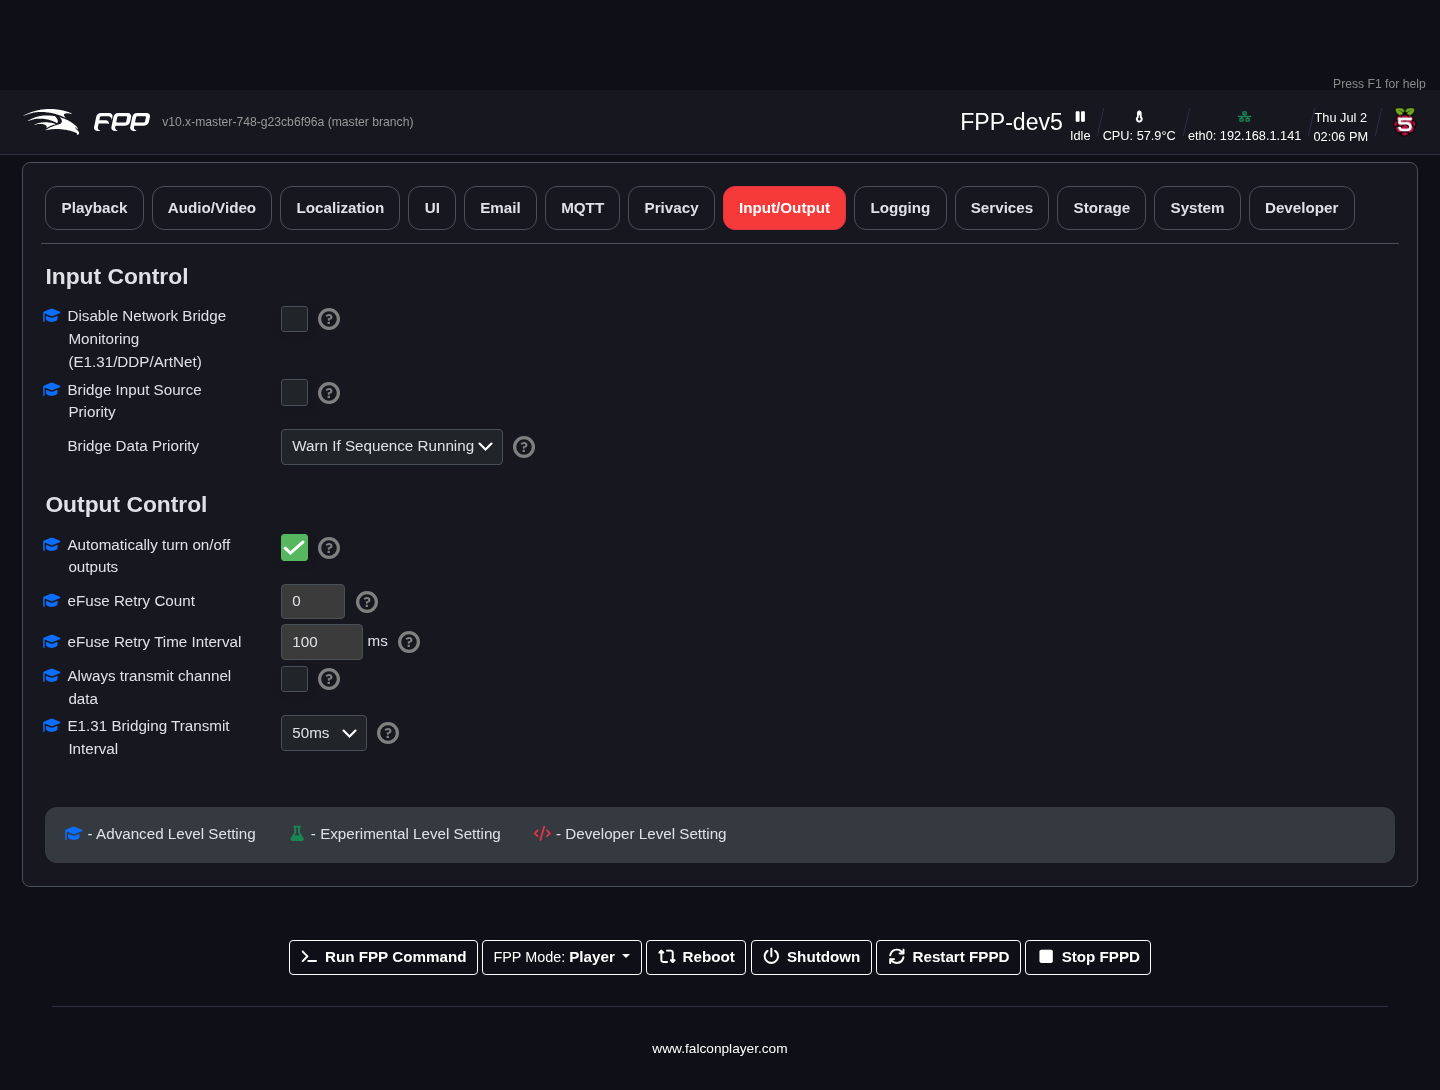
Input Control:
- Disable Network Bridge Monitoring – disable bridge monitoring (useful when developing your own bridge listener). (Advanced.)
-
Bridge Data Priority – how FPP treats incoming bridge data versus local playback:
- Warn if Sequence is running – warn but keep playing the local sequence.
- Prioritize Bridge – incoming bridge data overrides local sequences.
- Prioritize Sequence – local sequences override bridge data; bridge data is used only when nothing is playing (usually what you want during show season, so bridging does not interrupt the show).
-
Bridge Input Source Priority – when several senders transmit to the same input universe, lock onto one source and suppress the others. For E1.31 the priority byte in the packet header is honoured, so a higher‑priority source always wins; for ArtNet, which has no priority field, the first source seen wins. In both cases, if the active source stops sending for longer than the input timeout, the next packet from any source takes over. DDP is unaffected. (Advanced.)
- Hide Cape Controlled GPIO Pins – on by default. Hides GPIO pins the fitted cape is already using from the GPIO pin control page, so you cannot change a pin the cape depends on by accident. (Advanced.)
Output Control (Advanced):
- Automatically turn on/off outputs – for controllers that can cut output power when idle.
- Efuse Retry count / interval – automatically reset tripped eFuses (good for intermittent trips, especially at startup), and the wait between retries.
- Always transmit channel data – force output whenever FPP is running (FPP normally transmits only when a sequence plays or an overlay model is enabled). Use only for older controllers that go into test mode without data.
- E1.31 Bridging Transmit Interval – timing interval in bridge mode (default 50 ms, recommended; some devices only support 50 ms).
- Disable Colorlight outputs on link down – by default FPP disables ColorLight outputs when the link is down, below 1 Gbps, or no receiver is detected (a restart re‑enables it). Disabling this keeps the output active but you still get the warnings.
- Colorlight Firmware Version – manually select the ColorLight receiver firmware version if FPP cannot detect it.
Logging
Sets the logging criteria for the device. FPP creates several logs that help with troubleshooting. Normally leave this at Info unless the development team asks otherwise or you are an advanced user.
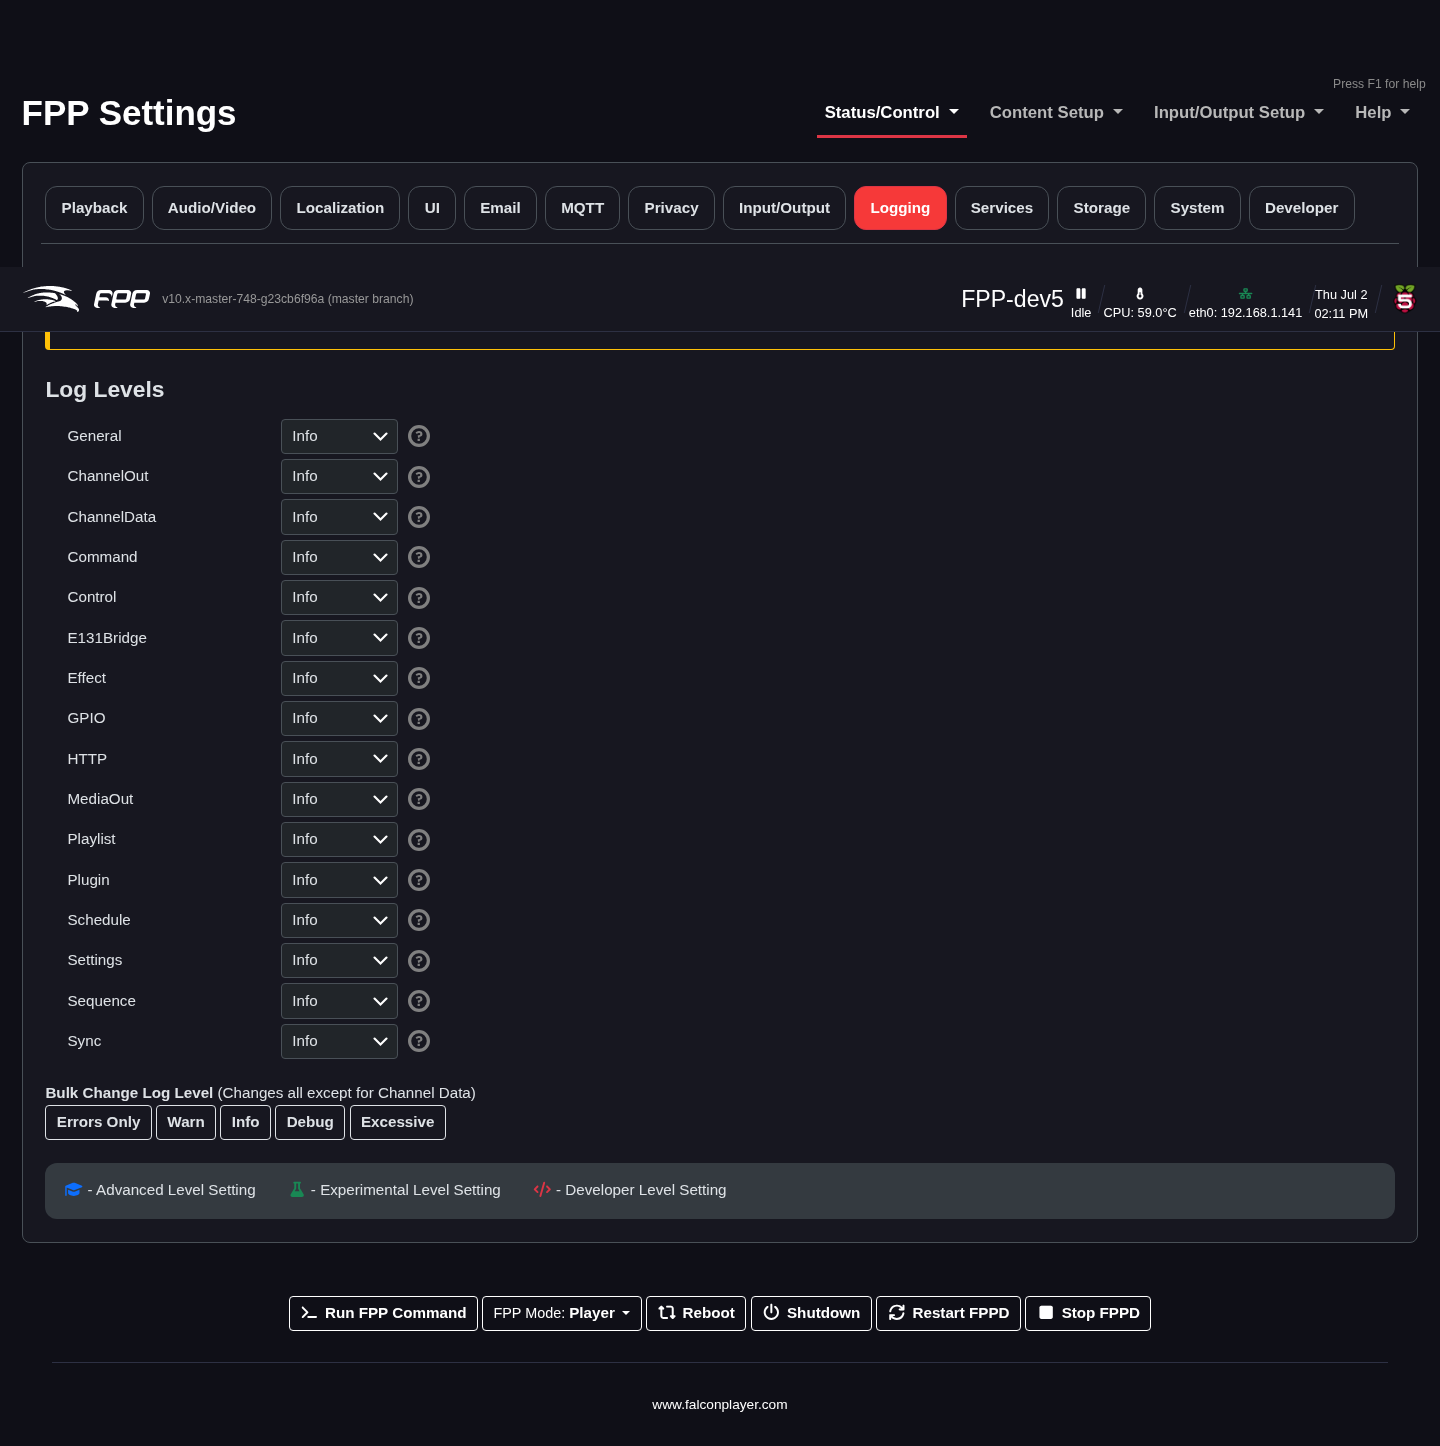
You can set the level per subsystem. The subsystems include ChannelData (serial and LOR output), ChannelOut (channel testing and overlays), E131Bridge (E1.31 and DDP input bridging), MediaOut (audio and video output), and others covering the scheduler, playlists, plugins and MultiSync.
The five levels are:
- Errors Only – only items identified as errors.
- Warn – only warnings.
- Info – basic information suitable for most troubleshooting (recommended for production systems).
- Debug – Info plus debug messages; use only when requested.
- Excessive – everything; can create very large log files and impact performance — use only when requested.
Note
Buttons at the bottom let you change all sections at once (except Channel Data).
Services
Configures optional system services; options depend on the SBC.
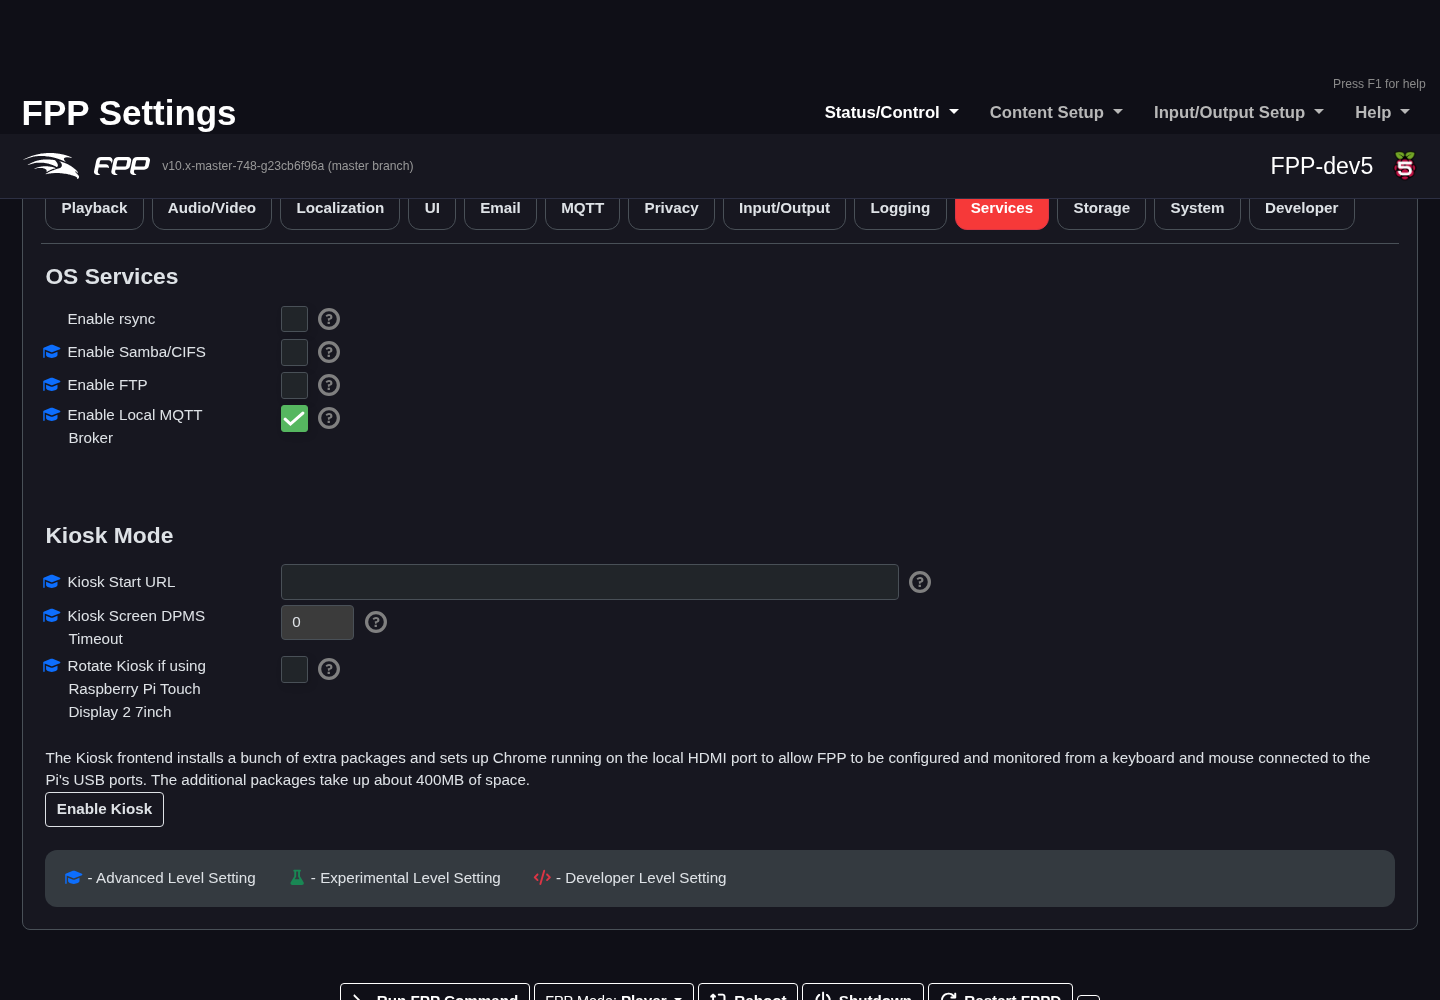
OS Services:
- Enable rsync – allow this device to receive files from other FPP devices (e.g. from the MultiSync page).
- Enable Samba/CIFS – access the media folder over SMB (e.g. Windows File Explorer). (Advanced.)
- Enable FTP – transfer files with an FTP client. (Advanced.)
- Enable Local MQTT Broker – run a local MQTT broker. (Advanced.)
- Let other websites read the API – allow a web page served from somewhere else (a dashboard on another computer, say) to read this player's API from the browser. Off by default. While it is on, any website you visit can read the API too — including the cape serial number and the settings — unless a UI password is set. FPP's own pages, other FPP players, xLights and apps that are not web pages never need it. (Advanced.)
Kiosk Mode (Pi only, Advanced) – for a fully standalone device with a connected touchscreen (an advanced configuration; not all touchscreens are supported):
- Kiosk Start URL – the page shown at startup (default: the Status page).
- Kiosk Screen DPMS Timeout – seconds before the display sleeps.
- Rotate Kiosk – tick this if you are using the Raspberry Pi Touch Display 2 (5 or 7 inch), which needs the output — and the touchscreen — rotated to landscape. The panel is found automatically on whichever DSI connector it is plugged into. Takes effect after a reboot.
- Enable Kiosk installs and enables Kiosk mode.
Storage
Configures where sequences and media are stored, and manages the device's storage media (Advanced UI Level or higher).
Flash FPP to Another Device:
FPP 10 replaced the old platform-specific eMMC/USB flashing pages with one flow that works on Raspberry Pi, BeagleBone and BeagleBone 64 alike. Each detected target device is listed with its own buttons:
- Create – write a clean FPP install to the target, leaving your media, sequences and settings behind.
- Copy – the same, but bring your media, sequences and settings along.
- Create (BTRFS) – as Create, using BTRFS, which compresses the file system but may slow the device slightly.
Either way the copy is given its own SSH host keys, so it can safely run as a separate player alongside this one.
Warning
Flashing erases everything currently on the target device.
Check you have selected the right one — the confirmation dialog names the
device and its /dev/ path.
Storage Device:
Selects which device holds the media directory (sequences, audio, video, images, logs). A device that is not yet mounted can be formatted from here, and when you change the location FPP offers to copy all existing files across.
Warning
On a Raspberry Pi 4 or 5, moving storage to a USB or NVMe device is strongly discouraged. It can introduce network lag, packet drops, audio clicks and pops, high CPU usage and longer boot times, and many advanced features and several capes/hats are known not to work with USB storage. It is also far less tested, so even patch upgrades carry a higher risk. Prefer an SD partition.
Note
A Raspberry Pi 5 limits its USB ports to 600 mA in total unless it detects a 5 A (27 W) supply, which matters if you are powering storage from the USB ports.
Mounted USB Device Actions:
- Force Unmount – unmount a USB device that is still mounted. If files are open on it, FPP lists the processes holding them so you can see what is in the way.
System
System‑wide settings; the page varies with the SBC and its hardware (there are separate Raspberry Pi and BeagleBone variants).
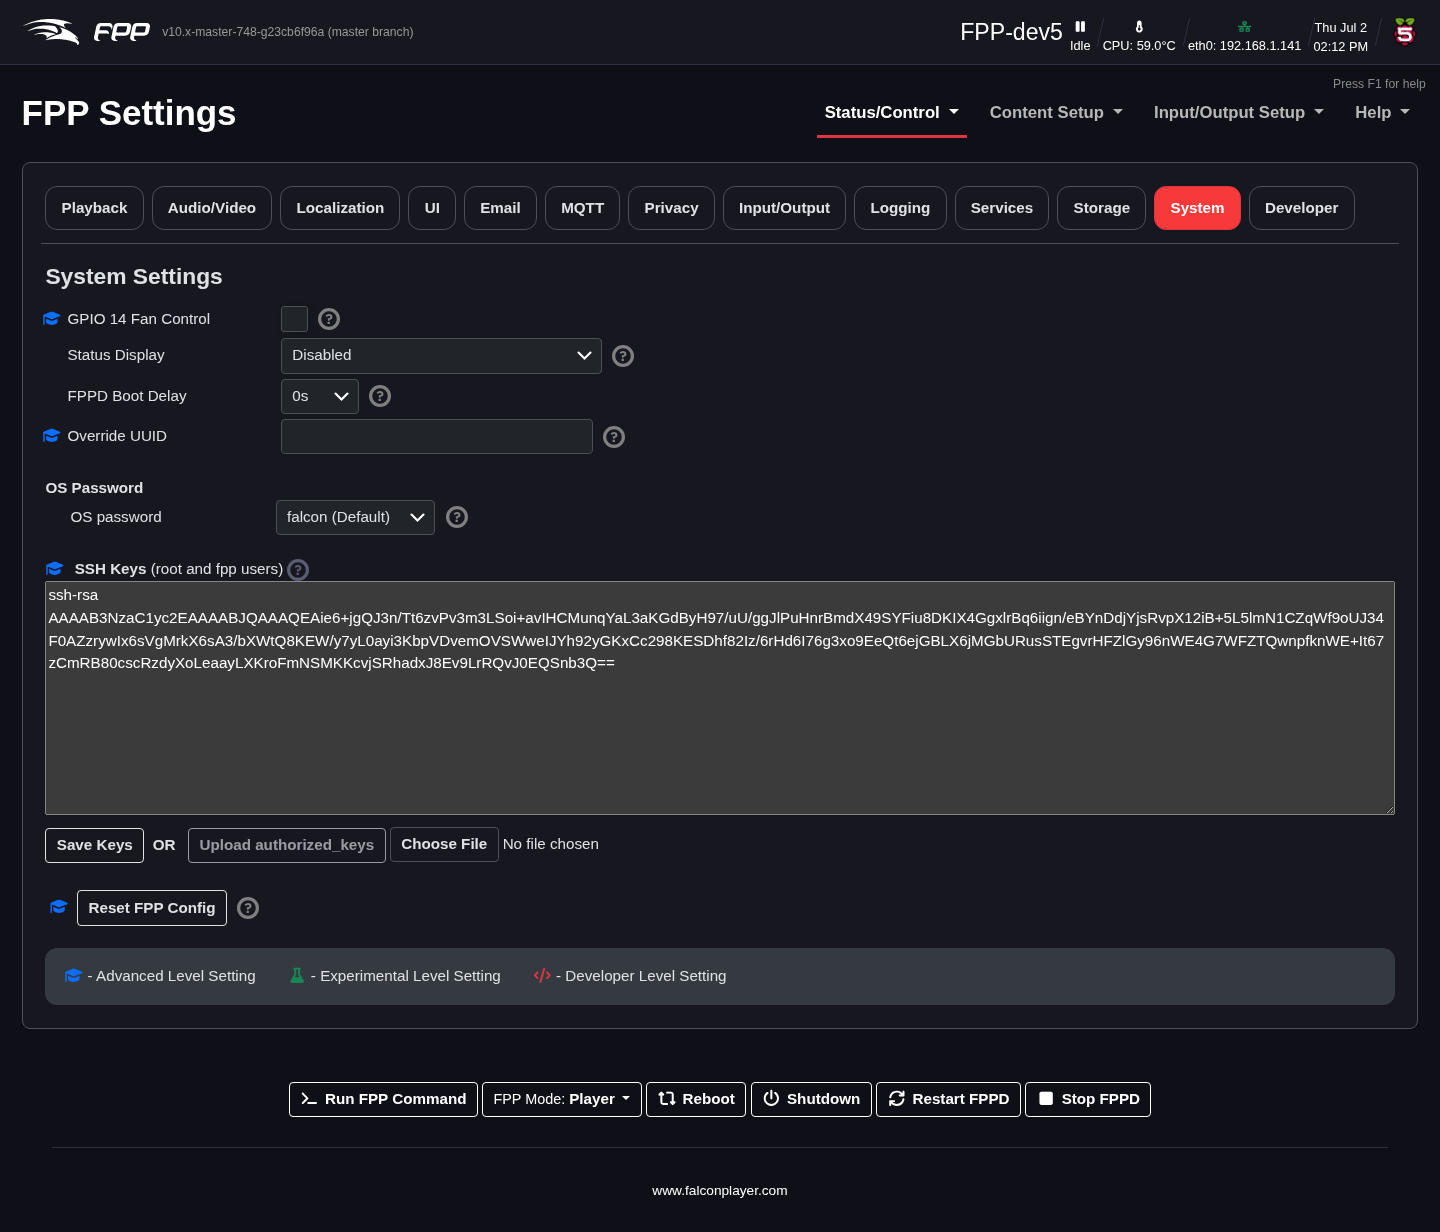
- GPIO 14 Fan Control – PWM fan control on GPIO 14. (Pi only, Advanced.)
- Fan On Temperature – the temperature above which that cooling fan switches on (default 70 C). Fan state is reported on the System Health Check page. (Advanced.)
- Disable IP announcement – during boot FPP announces its IP addresses over the audio output. Turn this off for production use, when the audio output feeds an FM transmitter or your show speakers.
- Override UUID – set the UUID FPP uses for FPP Connect de‑duplication, stats and services, instead of deriving it from the board's serial number. Only needed when two devices end up reporting the same identity. (Advanced.)
- Status Display – configure an OLED screen on the I2C bus (usually auto‑detected at boot); it shows IP addresses, status and the playing sequence. Select your OLED model here — 128×32 and 128×64 SSD1306/SH1106 displays, and 128×128 SH1107 displays, each in normal and flipped orientations.
- FPPD Boot Delay – delay FPP's startup, useful if you power everything on together and want routers/switches to initialise first. The Auto setting waits for a valid time source before booting (falling back to internal time after 10 minutes).
- Prevent HDMI CEC at Boot – stop the Raspberry Pi firmware sending the HDMI CEC "Active Source" message at boot. That message is what wakes a TV or projector from standby and switches it to the Pi's input after a power cut; FPP never sends CEC itself, so with this on a display left in standby stays dark until someone uses its remote. Only enable it if you would rather the display did not come on by itself. A plain monitor is unaffected, and it does not apply to a Pi 5. (Pi only; requires a reboot.)
- Enable HDMI Display – enable the HDMI port on a BeagleBone. (BeagleBone only, Advanced.)
Warning
Enabling the BeagleBone's HDMI port disables many GPIO pins, which will stop most capes working. Only turn it on if you are not using a cape.
- BeagleBone LEDs – control or disable the five on‑board LEDs (commonly disabled if distracting; defaults recommended). (BeagleBone only.)
- Reboot If USB WiFi Adapter Fails – on by default. Some USB Wi‑Fi adapters intermittently lose their USB connection while booting: the adapter is detected and the interface appears, but the radio never connects, leaving FPP running normally yet unreachable over the network. When FPP detects this specific failure it reboots to recover. It will only do so when USB errors are present and no other connection has an IP address — so an access point being switched off or out of range will not trigger one — and it gives up after two attempts so it can never boot‑loop. (Advanced.)
- OS Password – the password for SSH and similar access; the default
falconis recommended. - SSH Keys – configure SSH keys to authenticate with a key instead of a password. (Advanced.)
- Reset FPP Config – reset FPP to factory settings, either all options or selected areas — useful if a configuration or an xLights upload has gone wrong. See The Reset FPP Config dialog below.
Warning
Take an FPP Backup before Reset FPP Config (see Backup and Restore).
The Reset FPP Config dialog
Reset FPP Config opens a dialog where you choose exactly what to clear, rather than resetting everything blindly.
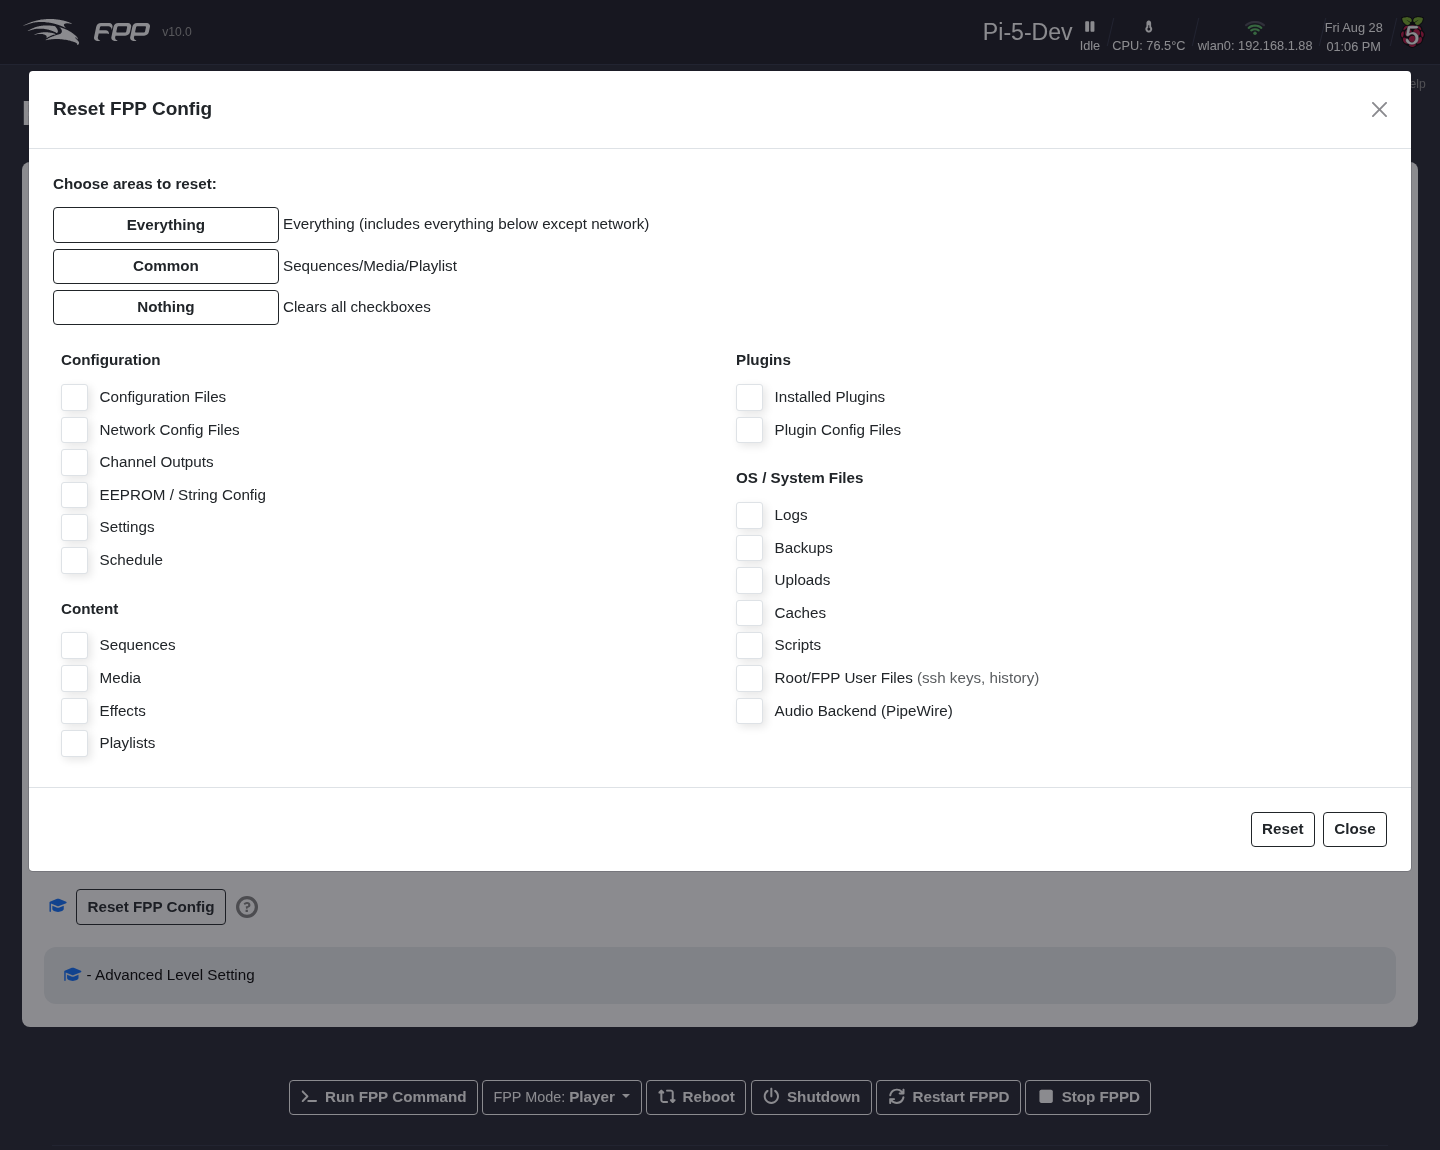
Three shortcut buttons set the tick boxes for you: Everything (everything below except network), Common (sequences, media and playlists), and Nothing (clears all the boxes so you can pick your own). The areas are:
- Configuration – Configuration Files, Network Config Files, Channel Outputs, EEPROM / String Config, Settings, Schedule.
- Content – Sequences, Media, Effects, Playlists.
- Plugins – Installed Plugins, Plugin Config Files.
- OS / System Files – Logs, Backups, Uploads, Caches, Scripts, Root/FPP User Files (ssh keys, history), Audio Backend (PipeWire).
Click Reset to apply, or Close to back out.
Note
Network Config Files is deliberately excluded from Everything, so a reset cannot cut off your own access to the device. Tick it explicitly if you really do want the network configuration cleared — and note that any DHCP server leases this device has issued are then cleared on the next reboot, not immediately.
Developer
Only shown at the Developer UI Level; useful for switching FPP versions or developer testing.

- UI Platform Masq – display settings for a different platform than the one detected (for plugin/feature development). Take care, as changes can adversely affect your device.
- Git Remote Repository – which git remote branch selection uses: FPP Releases (origin) is the main FPP repository, FPP New Feature Testing (newfeatures) is for new‑feature testing, and Pull Requests lists the open pull requests on the FPP repository so you can test one before it is merged. When GitHub credentials are set (below) and you have a fork of FPP, your fork's branches can be chosen too.
- Git Branch – choose which FPP version/branch to run, e.g. Master for the
latest improvements ahead of release. With Pull Requests selected the list
shows
#number - authorfor each open pull request (drafts are flagged [Draft]); choosing one checks it out locally aspr-<number>. If that pull request carries a configuration migration this device has not yet run, FPP stops on a confirmation screen listing it first, because a migration moves the configuration forward and is not undone by switching back. Note that some upgrades require an OS rebuild to get all benefits (see Final Configuration and Updating).
Warning
Switching branch or pull request pulls and recompiles FPP (which can take many minutes) and removes untracked files from the source tree. Do not do it during a show, and back up any development work first.
- Reset Local Changes – revert any manual code changes to the original code.
- Git Status – show the status of your local FPP version.
- FPP Rebuild – recompile all FPP files (useful after an interrupted install or corrupted files).
- GitHub User Name and GitHub Personal Access Token – credentials used to
install or upgrade plugins hosted in private GitHub repositories. The token
needs read access to those repositories and is stored locally in
/home/fpp/media/settings. They are only used when Use Credentials is selected on the Plugins page. - Distributed Compile – hand FPP's source compiles to a helper host to speed
up a full rebuild, such as after switching branch. The options are Off,
distcc, distcc + zeroconf, nocc and nocc + mdns.
distccpreprocesses locally then compiles on the helper;noccdoes not preprocess locally, which makes it far faster on slow single‑core boards such as a BeagleBone Black or Pi Zero. Thezeroconf/mdnsvariants discover helpers on the LAN automatically. The helper must run the same major compiler version — set one up withscripts/setup_distcc_host.shorscripts/setup_nocc_host.sh. Any distributed mode disables the precompiled header. - Compile Hosts – the space‑separated list of helper hosts to compile on. For
distcc use
host[:port][/jobs][,options], e.g.fpppi5:3632/6,lzo; for nocc usehost[:port](default port 43210), e.g.fpppi5. Leave it empty for the zeroconf / mdns modes, which discover their helpers automatically. - Enable NOCC discovery across Wireless Networks – shown when Distributed Compile is nocc + mdns. A Wi‑Fi access point can hold back multicast traffic, so helpers' announcements may arrive after FPP has stopped listening and a build reports no helpers even though they are running. Turning this on adds about 3 seconds to each build's helper search. Leave it off on a wired connection. The Dev Tools tab of Troubleshooting Commands lists the helpers FPP can currently see.
- Use 16K‑Page Kernel – boot the Raspberry Pi 5's 16K‑page kernel instead of the standard 4K‑page one. 64‑bit FPP images ship it disabled because some libraries FPP uses do not work with 16K pages; this exists for testing them. It only appears on 64‑bit images that carry that kernel, only affects the Pi 5, Pi 500 and Compute Module 5, and survives an FPPOS upgrade (at the cost of one extra reboot). (Requires a reboot.)