General Overview and Navigation
General Overview
The developers have built in several aids to explain the functionality of different settings. Most settings load based on the device FPP is running on, so you only see what is relevant and things are less confusing. FPP also has different UI Levels so that more advanced settings and functions do not clutter the screens (see FPP Settings → UI).
The four levels are Basic, Advanced, Experimental and Developer. Basic shows the settings most users need; Advanced exposes most of FPP's features; Experimental is for experts only and can expose settings that hurt performance or cause problems if misused; Developer is for developers and beta testers. In FPP 10 the level also governs which FPP Commands and which menu entries you see, not just which settings.
Tip
If you only need to configure one setting that requires an Advanced level
setting, you do not have to change your
Many settings have a Help popup, identified by a blue question‑mark icon. Hovering over the question mark brings up additional information specific to that item. Individual FPP Command arguments carry these tooltips too.
Program Settings and Navigation
The following chapters explain each program area and its settings, and how they work. Depending on your setup or FPP version, the screens may look slightly different.
The main page is reached from a web browser by entering the IP address or host
name of the device you set up — for example 192.168.1.101 or
http://YardPi.local/ (yours will differ).
At the top of every page is a status/navigation section:
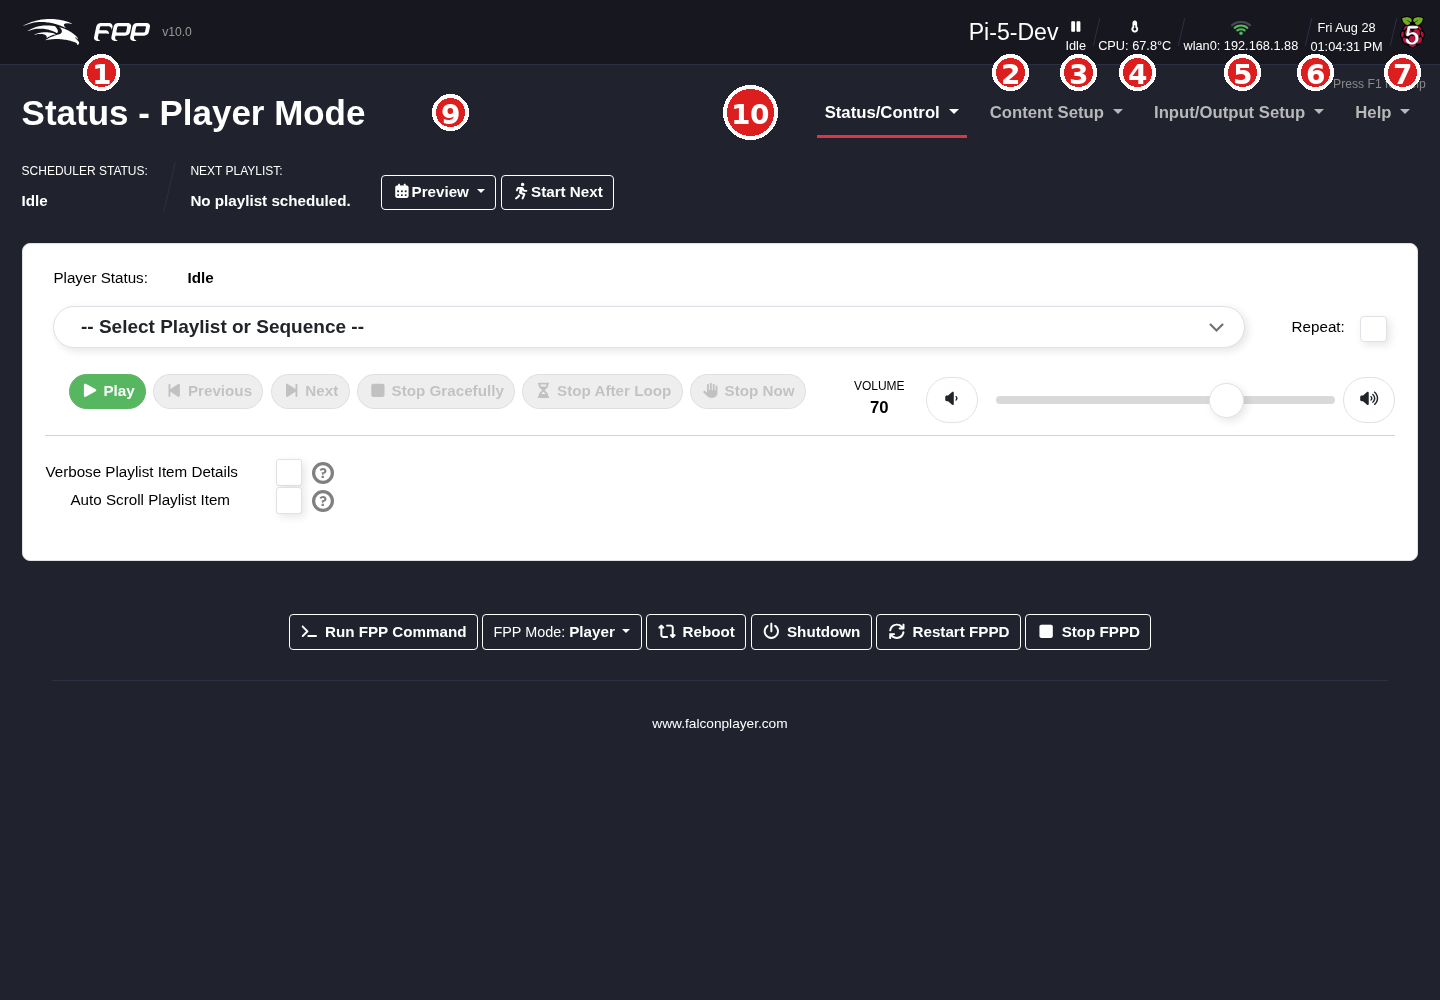
- FPP Logo and version – the current version is shown, and links to the System Upgrade (About) page to check for updates.
- Host name – this device's host name; it can be used to reach the device
(e.g.
http://Pi-5-Dev.local/) and links to the Host & DNS Settings page. (Not all networks support host‑name access.) - Player status – the current state. Idle when nothing is playing; Playing (hover to see the current sequence); or a Stopped icon when FPP is stopped.
- Sensors – if the device has sensors, their readings appear here. Change the units under FPP Settings → Localization. With more than one sensor, click to toggle between them.
- Network interfaces – a graphical status of each interface; hover for
details. For example:
-a. A live Ethernet connection with an IP address (this does not by itself
guarantee the connection is valid).
-b. A DHCP Ethernet connection that received no address and gave itself a
link‑local address (e.g.
169.254.x.x) — usually because it is connected to a controller or directly to a computer. -c. A wlan0 connection with an IP address and signal strength (e.g. −57 dBm), also shown by the number of green bars. -d. The device operating as a wireless access point. - Date and time – the current system date and time.
- Platform graphic – the hardware platform and variant (Raspberry or Beagle).
- Vendor logo – may show your cape vendor's logo.
- Section indicator – which area of FPP you are in.
- Main navigation toolbar – on every page; clicking a heading reveals the options for that category (each is covered in its own chapter). The headings are Status/Control, Content Setup, Input/Output Setup and Help.
Some menu entries only appear in certain circumstances:
- Variables and Recurring Tasks (under Content Setup) require the Advanced UI Level or higher — see Variables and Recurring Tasks.
- Port Status (under Status/Control) only appears on devices whose cape reports current monitoring. It was called Current Monitor before FPP 10.
- Cape Info (under Help) only appears when a cape or hat is fitted.
- Plugins add their own entries at the bottom of whichever menu their author chose.
In the upper‑right corner, Press F1 for help (or the F1 key) opens help specific to the current page.
Bottom control bar
At the bottom of every page are shortcuts to commonly used device functions:
- Run FPP Command – opens a popup to run one of the pre‑programmed FPP Commands (see Commands, Effects and Testing).
- FPP Mode – change the FPP mode (see below).
- Reboot / Shutdown – restart or power down the device.
- Restart FPPD – stop and restart the FPP daemon, reloading many configuration changes without a full reboot.
- Stop FPPD – stop the FPP daemon.
FPP Mode
FPP runs in one of two primary modes:
- Player – used when this device runs the show itself and/or sends show
data to other controllers. A player can communicate with other devices in two
ways:
- a. Output E1.31/DDP/ArtNet to other controllers or FPP devices — sending the full pixel data frame by frame. Common on a wired network driving one or more controllers. This requires the appropriate Channel Outputs to be configured.
- b. Send MultiSync packets — used when you have more than one FPP device
and want them synchronized via small sync packets. Each remote needs
only a copy of the sequence (
.fseq) files; the player holds the playlists and schedules.
- Remote – used to synchronize this device (and its attached controller or
cape) to a player, in one of two ways:
- a. MultiSync — the remote listens for MultiSync packets from a player and
syncs its output to match. The remote needs a copy of every sequence
(
.fseq) that will be played (see the MultiSync chapter). - b. E1.31/DDP/ArtNet — the remote receives streamed data instead; this requires the input to be configured (see Channel Inputs and Separate Network).
- a. MultiSync — the remote listens for MultiSync packets from a player and
syncs its output to match. The remote needs a copy of every sequence
(
Update indicators
- A minor upgrade (same development branch) shows an orange icon in the header; click it to go to System Upgrade and update.
- A major upgrade (new branch) shows an orange bar offering the upgrade; clicking the button takes you to System Upgrade.