FPP Quick Start Guide
This section gives you the basic configuration to get up and running. It may not be the ultimate configuration you need for your finished show — refer to the rest of this manual, and in particular General Overview and Navigation, for in‑depth explanations of each function and setting.
The essential steps are:
- Prepare the hardware – gather a supported board, a suitable micro‑SD card and power supply (see Hardware Needed).
- Write the FPP image to the SD card (see Installing the FPP Software). The easiest route is the Raspberry Pi Imager, which can download the correct FPP image for you.
- Boot and connect – insert the card, power on, and browse to
http://fpp.local/(or the device's IP address). The first boot takes a few minutes while the filesystem expands. - Set the network – configure the network settings so that you can communicate with your devices (see Initial Network Configuration).
- Choose the mode – set FPP Mode to Player for your main controller, or Remote for devices that are going to be controlled from another device. (see The Status Page and MultiSync).
- Set the time zone – on FPP Settings → Localization, so schedules run at the right time.
- Configure your outputs – tell FPP how your lights are connected on Input/Output Setup → Channel Outputs.
- Add content – (If needed) upload sequences and media on Content Setup → File Manager.
- Build and schedule a playlist – create a playlist on Content Setup → Playlists and set it to run on Content Setup → Scheduler.
Installing the FPP software, initial network configuration, and updating are covered in detail in the sections below; the rest are covered in their own chapters elsewhere in this manual.
Installing the FPP Software
Operating‑system files are called images. To install FPP you need a program for "burning" the image to the micro‑SD card, and optionally one for formatting the card first.
Note
You cannot simply copy the files to the card — the image must be written with imaging software.
Required programs
An SD card formatter (optional):
- (https://www.sdcard.org/downloads/) — versions for Windows and Mac.
- (https://gparted.org/) — for Linux systems.
An image‑writer program:
- Raspberry Pi Imager — can download the FPP image for both Raspberry Pi and BeagleBone hardware directly, as part of the installation process.
- Balena Etcher (https://www.balena.io/etcher/) — Windows, Mac and Linux.
- dotNet Disk Imager (https://sourceforge.net/projects/dotnetdiskimager/) — a good option for Windows; it can also wipe the SD card, so you won't need a separate formatter.
Getting the FPP software
The software is available at (https://github.com/FalconChristmas/fpp/releases),
where you can download the most current image file (not the application
source code). The image file has .img.zip in its name.
Image files start with FPP and indicate the version and SBC image. Download the
one that matches the SBC you are using:
- Pi64 — for all Raspberry Pi 3/4/5, Zero 2 W, CM4/CM5 variants
- Pi — for all other Raspberry Pi variants.
- BB64 — for the PocketBeagle 2.
- BB — for all other BeagleBone / PocketBeagle variants.
Several releases are listed on GitHub; not all have an image. Scroll down until you find the first version that provides images.
Note
If you are going to use the Raspberry Pi Imager, you do not need to download the image file first.
Depending on your imaging program, you may have to unzip the file before you can
use it (uncommon). If your imaging software cannot write directly from a .zip,
make sure you flash the .img file, not the .zip; if unsure, unzip first.
The three most popular methods are covered below — Raspberry Pi Imager,dotNet Disk Imager, and Balena Etcher. Use the method for the software you have.
Note
Raspbery Pi Imager can be used for BeableBone images as well.
Formatting the micro‑SD card (optional)
Before writing the image you may format the card to remove any existing partitions. This is not usually needed with most imaging programs. Insert the card and do a Quick Format using the SD Card Formatter (not the Windows or Mac file manager).
Burning with Raspberry Pi Imager
The Raspberry Pi Imager is convenient because it downloads the chosen image as part of the process — you do not need to download the file separately. (Steps below match Imager 1.8.5; other versions differ slightly.)
- Open Raspberry Pi Imager. Click Choose OS (do not use Choose Device).
- Select Other specific‑purpose OS, then FPP OS.
- Choose the FPP version to image — the most current is recommended — matching your device (Pi or BBB).
- Click Choose Storage and select your SD card, then click Next.
- Click Yes to accept overwriting the card, and wait for the progress page.
Note
If you are asked that the SD card is "not readable" and whether to format it, do not select yes.
When finished, click Continue and proceed to Software Installation.
Burning with dotNet Disk Imager
- Open dotNet Disk Imager (allow it to make changes if prompted).
- (Optional wipe) Select your SD card under Device and click Wipe Device; confirm and wait for completion.
- Choose the downloaded image file via the file icon next to the Image file box, and select the SD card as the target.
- Click Write to Device (confirm if prompted) and wait for the completion message.
As above, do not format the card after writing. Turn the device off and insert the card and proceed to Software Installation.
Burning with Balena Etcher
- Open Balena Etcher and click Select Image; choose the downloaded image file.
- Make sure the correct SD card is selected as the target.
- Click Flash! (confirm if prompted) and wait for the completion message.
Note
Some users have resolved Balena Etcher errors by running it as an Administrator, or by unblocking the image file in its properties.
The written image is not in a format Windows or Mac can read, so you may see an error after flashing. Do not format the card afterwards. Turn the Pi/BB off, insert the card, and proceed to Software Installation.
Software Installation
FPP is configured from a web interface — you do not need to connect a monitor to the device. You access it from a web browser on another computer.
Note
Google Chrome is recommended. Some versions of Internet Explorer / Microsoft Edge have had trouble displaying the interface correctly.
Before you begin, decide how the device will ultimately connect to your network —
Wi‑Fi, Ethernet, or (in a few cases) both — and make sure the appropriate
connection or adapter is fitted first. You will also need to know your home
router's IP address (commonly 192.168.0.1 or 192.168.1.1, among others).
Important
If your home router uses a subnet of 192.168.6.x,
192.168.7.x or 192.168.8.x, FPP will likely have communication problems —
these are the default subnets used by Windows, Mac and Linux for USB tethering
and by FPP's Wi‑Fi tether, and can conflict. Change your home network to a
different subnet to avoid problems.
There are three basic ways to install and configure FPP:
- USB Tethering — probably the easiest method: connect your computer directly to the device with a USB cable. Only a few devices support USB Tethering: Raspberry Pi Zero W, BeagleBone Black, PocketBeagle, BeagleBone Green, and BeagleBone Green Gateway. (The PocketBeagle 2 does not support USB tethering.)
- Network Connection — connect the device to your router with an Ethernet cable (not directly to your computer). Any Pi or BeagleBone with an Ethernet port or adapter can use this method.
- Wi‑Fi Tethering — for devices with Wi‑Fi tethering capability (on‑board or via a supporting adapter), useful when no other method is available.
Warning
If you are using the KulpLights K4‑PB v2.0 or K40‑PB v3.0 (produced in 2022), do not use USB tethering — it could destroy the USB circuitry.
USB Tethering Installation
Note
If the device needs a network adapter for its final connection, fit it before you start (e.g. a PocketBeagle you will later connect via Wi‑Fi). Some capes draw more current than a USB connection can provide — you may need to remove the cape before connecting the USB cable.
Note
Only a few devices support USB Tethering: Raspberry Pi Zero W, BeagleBone Black, PocketBeagle, BeagleBone Green, and BeagleBone Green Gateway. (The PocketBeagle 2 does not support USB tethering.)
- Make sure the SD card with the correct image is inserted.
- Fit any network adapters you will need for your final configuration.
- Connect one end of the USB cable to your computer. (Do not also connect a power supply to the device.)
- On some older BeagleBone Black boards, for the first install you may need to press and hold the S2 button (near the SD card) and hold it for 5 seconds after connecting.
- All other devices — plug the USB cable into the device. (On the Pi Zero, use the USB port, not the power‑only port.)
- Wait about one minute (a Pi Zero may take slightly longer).
- Open a browser and go to
192.168.7.2(Windows) or192.168.6.2(Mac/Linux). For a PocketBeagle 2 the tether IP is192.168.7.2on all computers. - Continue to Initial Configuration.
Network Connection Installation
Note
Some capes have RJ45 ports that are not Ethernet — they are for DMX or differential receivers and cannot be used for setup. Fit any required network adapter before starting.
- Insert the SD card with the correct image.
- Fit any network adapters you will need.
- Connect the Pi/BB to your router with an Ethernet cable.
- On some older BeagleBone Black boards, hold S2 for 5 seconds after connecting power for the first install.
- All other devices — connect power.
- Wait about one minute.
- Browse to
http://fpp/orhttp://fpp.local/. (If you cannot connect, see the Help and Troubleshooting chapter.) - Continue to Initial Configuration.
Wi‑Fi Tethering Installation
Use this if your device supports Wi‑Fi tethering, or to make changes when the device cannot otherwise connect to your network (without re‑imaging). You need a computer with a wireless connection.
Note
Many USB Wi‑Fi adapters do not support Wi‑Fi tethering (on‑board Wi‑Fi on Raspberry Pis usually does).
- Insert the SD card with the correct image.
- Fit any network adapters you will need.
- On some older BeagleBone Black boards, hold S2 for 5 seconds after connecting power for the first install.
- All other devices — connect power.
- Wait about one minute.
- On your computer, connect to the wireless network named FPP; the password is Christmas.
- Browse to
192.168.8.1. - Continue to Initial Configuration.
Initial Configuration
Once FPP is installed, the Initial Setup wizard walks you through the common or required settings in four steps. The step you are on is highlighted along the top; use Next and Back to move between them, and Finish Setup on the last step.
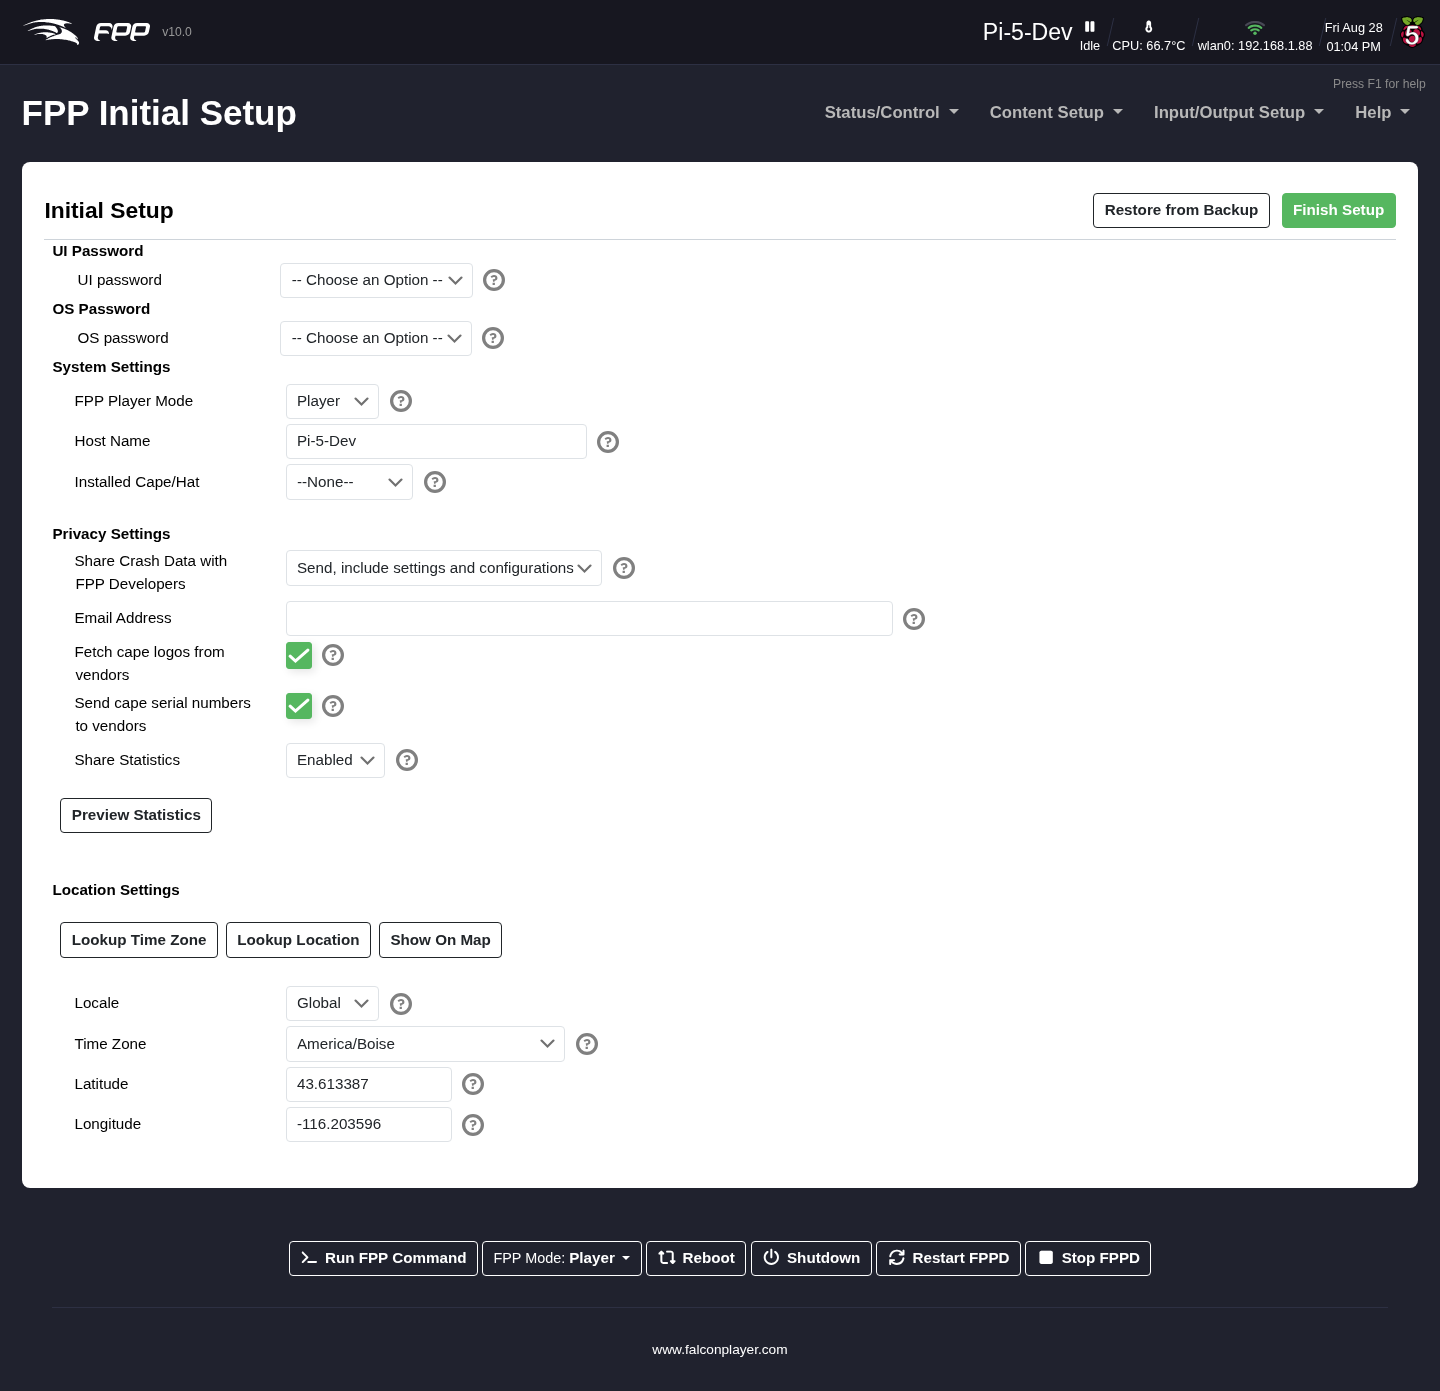
- Location — Holiday List (which holidays the scheduler knows about), Time Zone, Latitude / Longitude (for sunrise/sunset scheduling), the WIFI Regulatory Domain, and the Legal Jurisdiction — which privacy rules apply where the device is used. Lookup Time Zone, Lookup Location and Show On Map help fill these in; if the player has no internet, the location is taken from your browser instead. The jurisdiction must be answered before you can continue. See FPP Settings → Localization.
- Device — FPP Player Mode (if unsure, leave it at Player; see The Status Page → FPP Mode), Host Name and Host description (a meaningful name for this device; see Network → Host Settings), Installed Cape/Hat (if your cape/hat has no EEPROM, define the Virtual EEPROM here; see Pixel Port Licensing) and the User Interface Level.
- Privacy — the same Allow / Deny table as FPP Settings → Privacy: usage statistics, cape logos (and serial number), crash reports and how much they include, and an optional contact e‑mail. Each row says what is sent and to whom. Depending on the jurisdiction you chose, the rows start either pre‑filled or unanswered — in regions that require a device to ask first, you must answer every row before continuing.
- Security — the UI Password (the recommended choice is No Password; see FPP Settings → UI) and OS Password used for SSH (the recommended choice is falcon (Default); see FPP Settings → System). At an Advanced UI level you can also add SSH Keys here.
The wizard also offers Restore from Backup to restore a previous configuration, which saves time in setting a replacement or rebuilt device up from scratch. As well as restoring from an FPP backup file, FPP 10 adds a File Copy Restore option that brings the configuration across directly. See Backup and Restore.
After completing initial setup, work through the Initial Network Configuration and the rest of this manual to finish setting up your show.
Initial Network Configuration
After completing Initial Setup, click Finish Setup on its last step. Back on the main screen you will see a reboot warning — do not reboot yet. Instead open Status/Control → Network to configure how the device connects.
You should decide how you want your network configured before editing these settings (see Networking → Overview if you are unsure). For a temporary arrangement you can use a wired‑on‑home‑network configuration so you can update the software and finish configuration before deploying the device in its final location — this is also a good testing configuration. If your device has no Ethernet port but has a Wi‑Fi adapter, a separate show network may be a better option.
Note
The Network page is covered in full in the Network chapter; this section walks through the first‑time setup.
Wi‑Fi network settings
(Skip to Ethernet settings if you do not need Wi‑Fi.)
Note
Many USB Wi‑Fi adapters do not support 5 GHz; 2.4 GHz networks are recommended for their better range. To configure Wi‑Fi with no adapter fitted, see Network → Interface Settings.
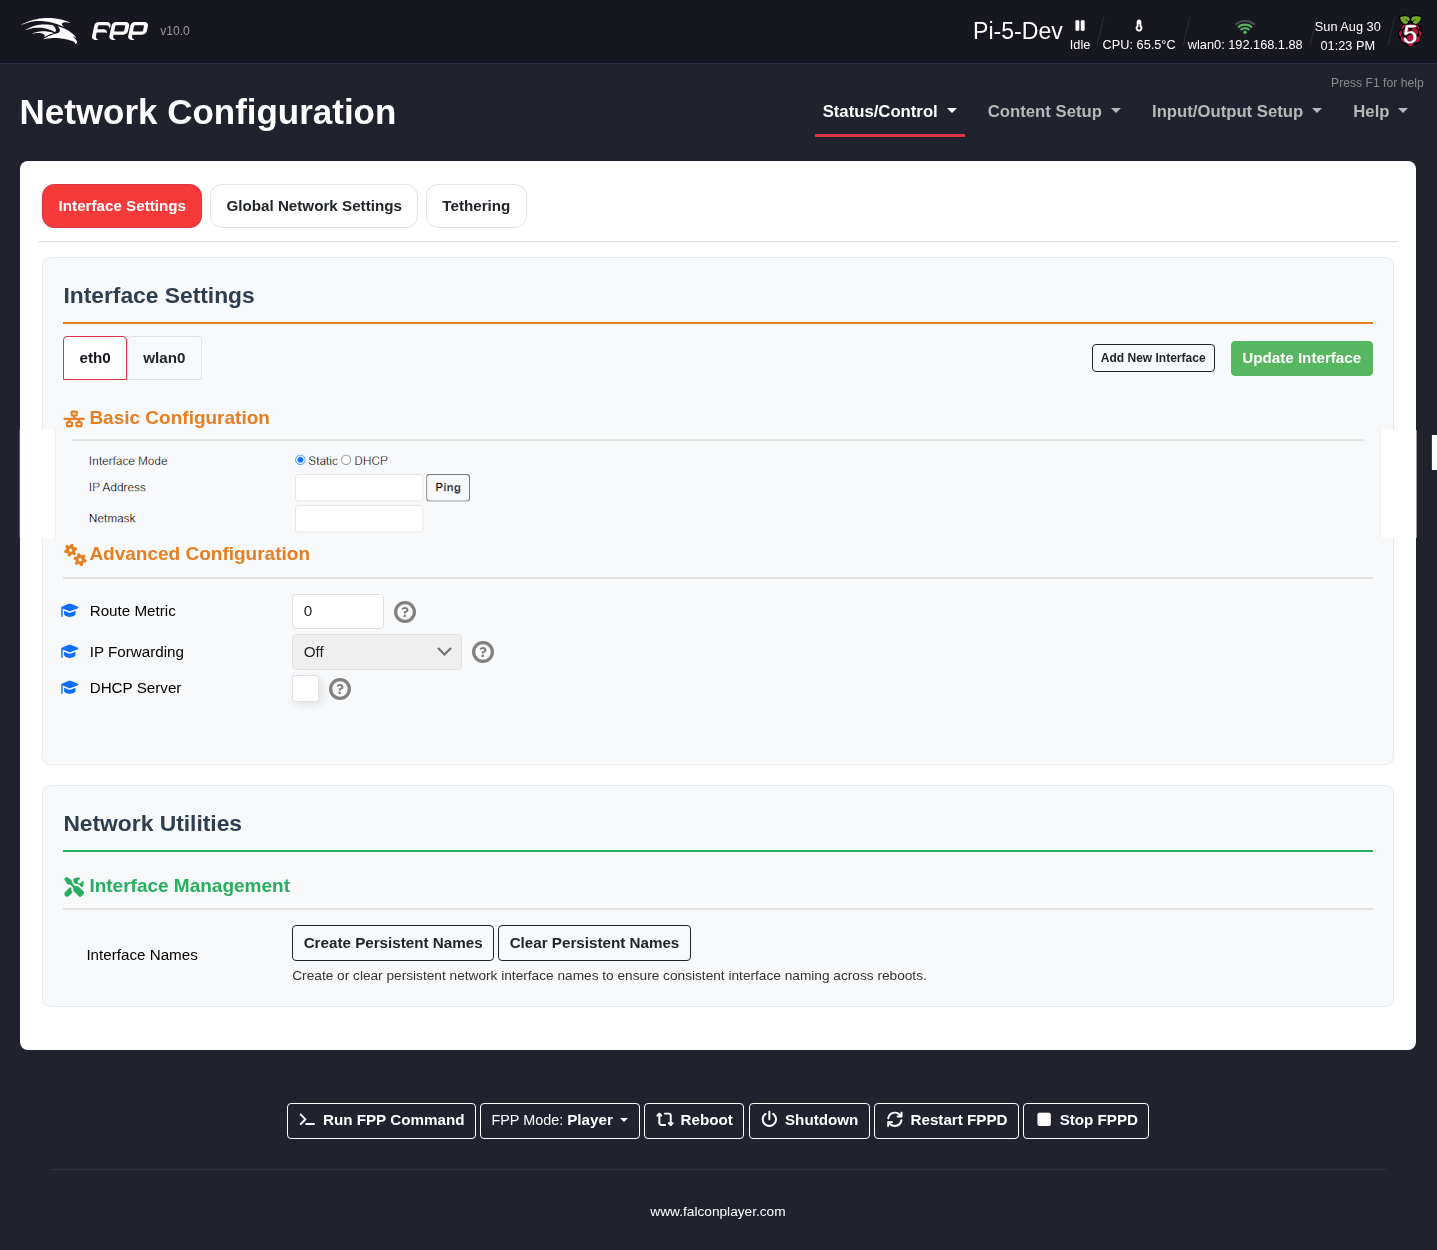
- Click the wlan0 interface (the wireless interface).
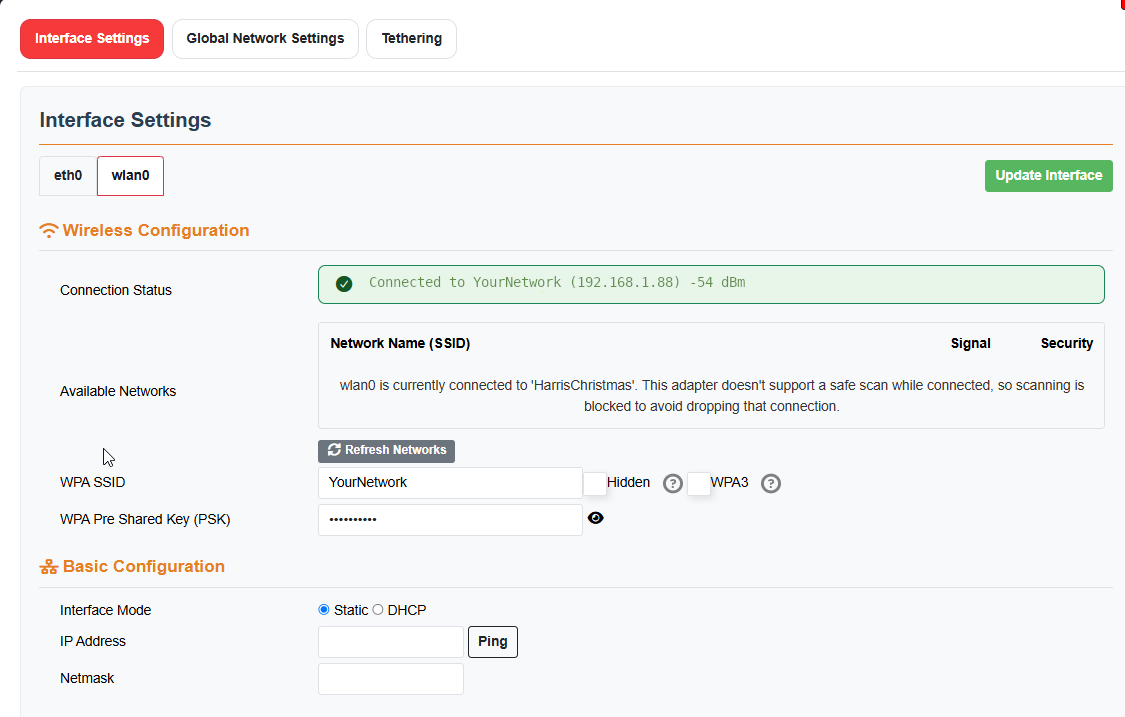
- Enter your WPA SSID exactly as configured in your router (including capitalization); you can usually pick it from the available networks.
- Enter the WPA Pre‑Shared Key (PSK) — your wireless password — exactly as configured (use the show/hide button to check it).
- Select your interface mode (Static or DHCP)
Note: With DHCP, a correctly configured host name and DNS server become important.
- If you are going to use a Static IP address, enter an IP address unique to this interface.
- Netmask — for most consumer networks this is
255.255.255.0(match your router). - Click on the Green Update Interface button.
Ethernet network settings
(Skip to Finishing up if you do not need Ethernet.)
- Click the eth0 interface (the wired interface).
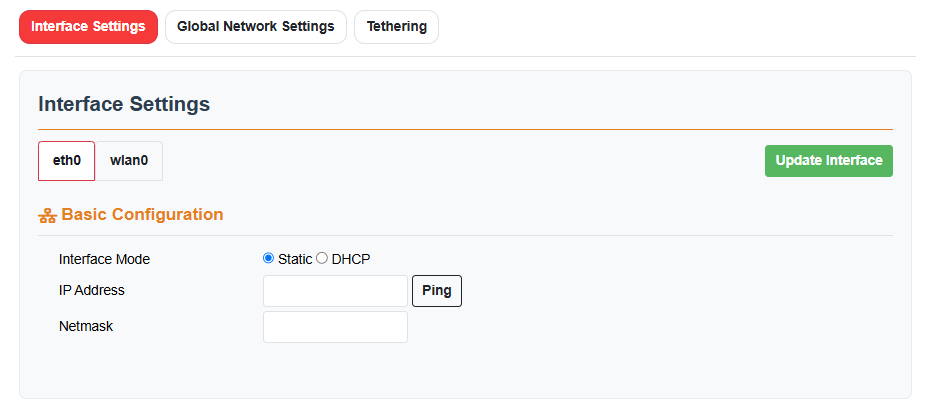
- Select your interface mode (Static or DHCP)
Note: With DHCP, a correctly configured host name and DNS server become important.
- If you are going to use a Static IP address, enter an IP address unique to this interface.
- Netmask — usually
255.255.255.0(match your router). - Click on the Green Update Interface button.
Finishing up
- Click on the Global Network settings button on the top of the page
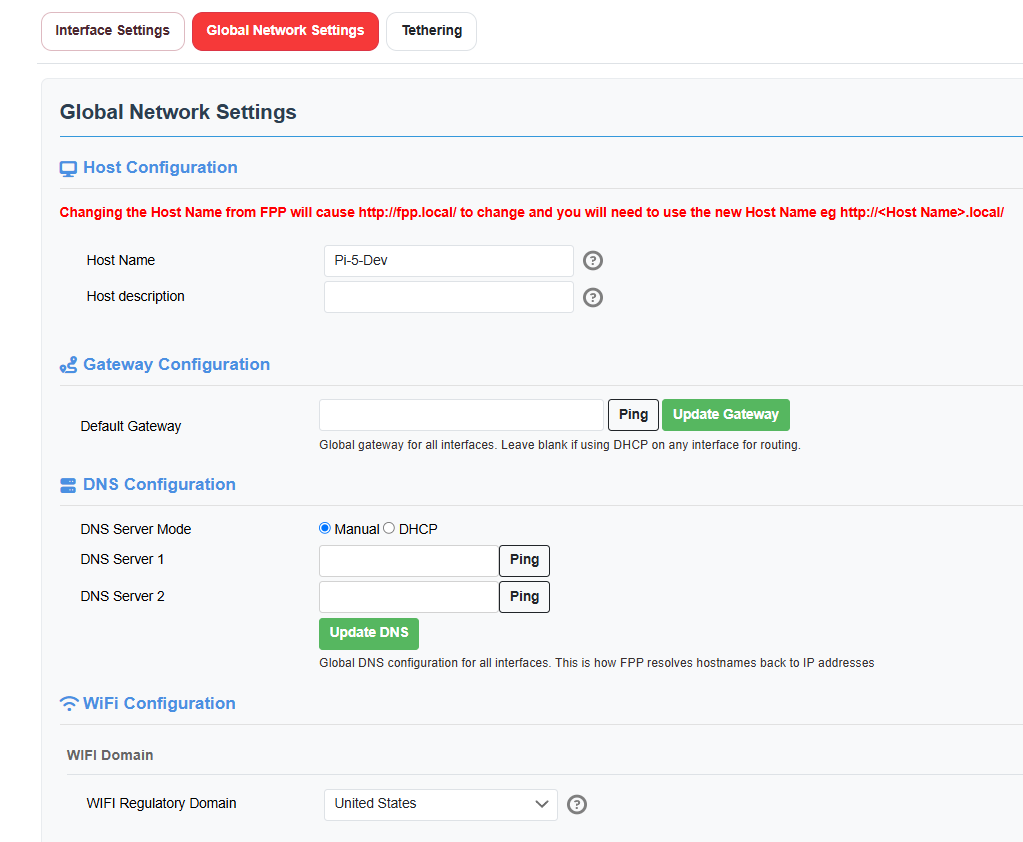
- Host Name Change the Host name if you need to.
- Default Gateway — usually the IP address of your home/show router; it is often filled in automatically, but check it. Click on Update Gateway.If you are using DHCP, leave it blank.
- DNS Server Mode — if any interface uses a static IP, set this to Manual and configure the addresses. Click on the Update DNS button
- Select the WiFI Regulatory Domain to the country where you will use the device. Once eth0, wlan0, host and DNS are all configured, double‑check them. When correct, click Reboot (from the red banner at the top or the button at the bottom).
At this point the device must be connected to your network according to the configuration you set, since you may not be able to reach it otherwise.
Final Configuration and Updating
Reconnecting after the network change
Once the device is connected to your network using the settings you entered, open its web page by using either the static IP address that you configured or using the host name you configured. To connect to the device via host name, enter the address in this format: devicehostname.local The page currently on your screen may no longer reach your FPP device. If you cannot reach the FPP page, see the Help and Troubleshooting chapter.
In most configurations FPP has internet access and will keep the correct time automatically. If your device will not have internet access and has a Real‑Time Clock (RTC) installed, see (FPP Settings → Localization → Time Config).
Updating the software
You should update to the current version of the software. Open Help → System Upgrade.
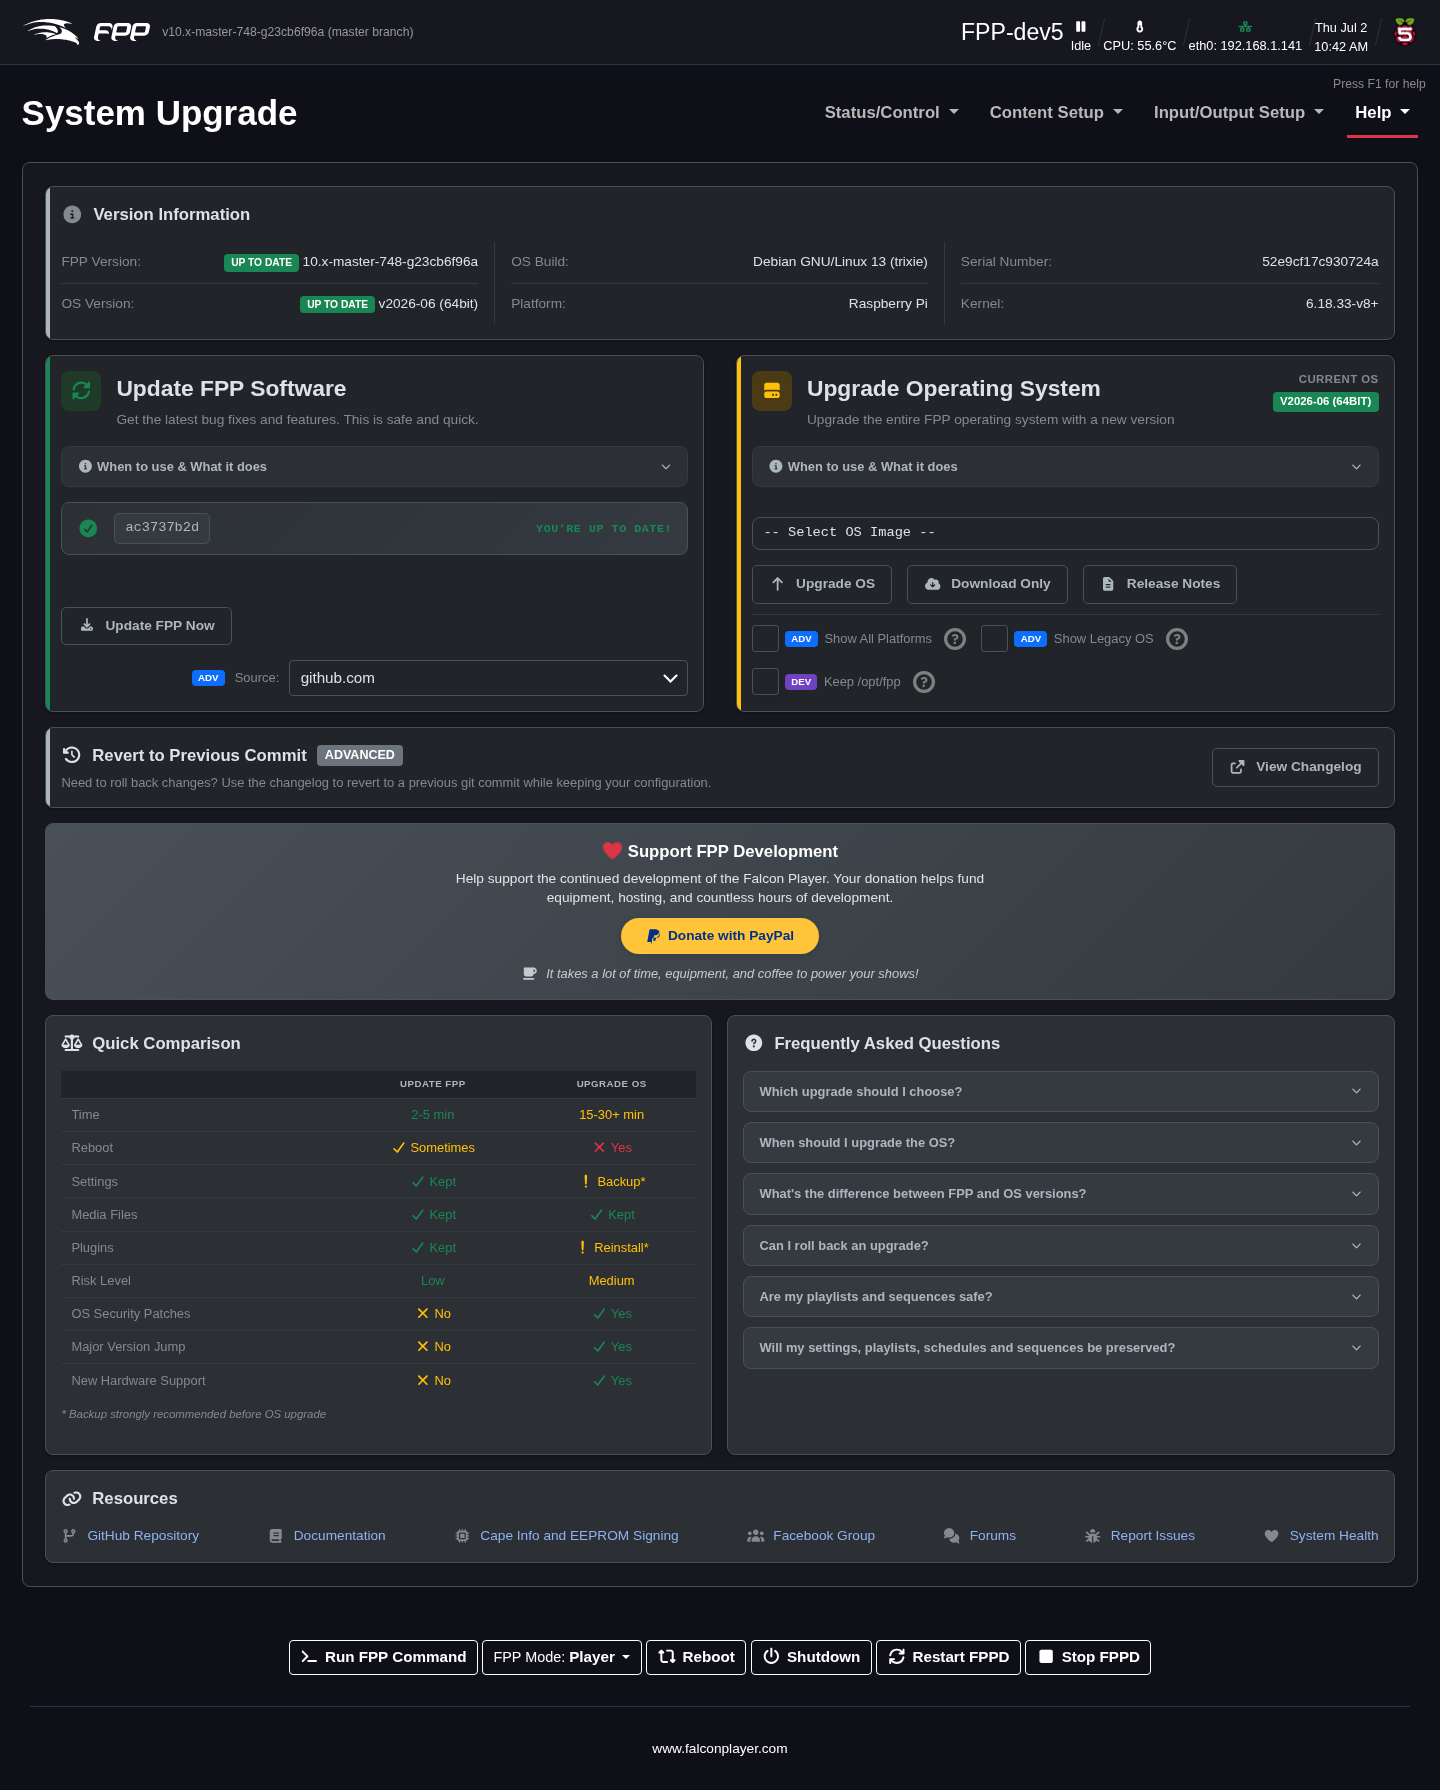
This screen shows the FPP version you are running and, if an update is available, says so on the Update FPP Software card. Click Update FPP Now.
Note
If the version status stays unknown (a grey dot) or the update check fails, FPP usually cannot reach the internet — most often a network/DNS configuration problem. See the Help and Troubleshooting chapter.
You will get a progress screen; the update can take several minutes. When it finishes, click Close at the bottom. (You can Hide the window and keep working — a banner on every page lets you reopen the progress.) In FPP 10 the progress pop‑up also shows the current stage in its title, so you can tell how far along an FPP or FPPOS upgrade is at a glance — useful when the window is in the background.
Sometimes a newer release is offered — if so, click Upgrade to …. You will usually see a Release Notes page; some updates need a matching Operating System (OS) update to gain full functionality, and that will be noted there.
Note
If the release notes indicate an FPPOS upgrade may be required, clicking Upgrade will not upgrade the OS — that is a separate step. See Help → System Upgrade for details.
Confirm any prompts and let the update run, then click Close. When complete, the screen returns to the About page and you can verify the version. When fully up to date, the FPP Version shows a green Up to Date dot.
Your FPP software is now installed and up to date. There are many ways to use FPP, and the settings needed to run your show vary with your particular setup — refer to the appropriate chapters that follow for details.
Note
After an FPPOS upgrade, FPP 10 prompts you to reinstall your plugins — an OS upgrade replaces the underlying system, so plugins need to be put back. Accept the prompt, or reinstall them yourself from the Plugins page (the Reinstall All button does the lot).
Tip
Always take an FPP Backup (see the Backup and Restore chapter) before a major upgrade, so you can roll back if needed.